Monday 31 October 2016

Typography, Fonts and Quotes - A simple tag!

Good Morning all....

..... on what is apparently quite a foggy Monday morning in some areas of the UK.  Here in my little bit of Nottinghamshire we have a pretty pearly sky and it looks as though we could have a pleasant day ahead.

The fab new topic of Typography, Fonts and Quotes which started on the PaperArtsy Blog Challenge last night is one I love, especially quotes. As always the intro to the topic from Darcy is interesting, informative and full of wonderful inspiration so do hop over for a looksee.  It's is very rare I make something that doesn't have some form of script/wording on it so I'm hoping I have lots of time to play this next two weeks.

I have a simple tag to share this morning which I already had out on my desk having hoped to make another quick entry to the previous topic but it didn't get done so I changed plans to the new topic.


A few days ago I rediscovered some tags which my friend Judith shared several years ago now and which had been stained with coffee or tea  and I used one for this piece.  It actually still has a lovely faint aroma of coffee after all this time ;-)!  I started by blending some Vintage Photo Distress Ink around the edges and then stamped the beautiful delicate script stamp from one of Lin Brown's latest stamp sets using Potting Soil Archival Ink.  It amazes me how a stamp so fine and detailed can stamp so clearly.  Next I stamped the grass, another gorgeous stamp from the same set using Sienna Archival Ink.


I found a small Kraft tag, inked the edges with Vintage Photo then stamped the skeleton leaf from Lin's other new release with the same ink.  I stamped the quote onto a piece of vellum several times with Sienna Archival and heat embossed with clear ep before cutting it into bits to give me the widest border around the words possible and stuck the bits on.

I really enjoyed this bit of spontaneous play and I'm off to link up to the challenge before getting stuck into the usual boring Monday chores, lol!

Have a good week!

Hugs
Lesley  Xx


Sunday 30 October 2016

PaperArtsy Blog Challenge #20 - Squares and Grids

Good Morning all on this very grey Sunday.

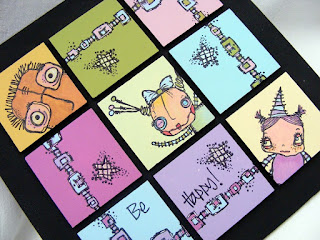
It's rather damp too so I'm glad that the project I had great fun creating yesterday (gave myself a whole playday ;D) is nice and bright and cheerful.  It's the final day for entry into the current PaperArtsy Blog Challenge and I didn't think I'd get anything made in time but I so wanted to ink up my new Elena Zinski stamps then on Friday evening my buddy Hazel shared a fab bright abstract project on the PA Blog which gave me the inspiration to get started.


First I covered a 20 cm square canvas board with black gesso and set it aside to dry.


Next I took nine 5cm square pieces of Stampbord and nine different colour PaperArtsy Fresco Finish paints and painted each square by patting the paint on with a piece of Cut n Dry foam.  If you want a smoother finish use the soft foam side and if you want a more textured finish use the hard side. I edged each square with black gesso.......very carefully, lol!


When the squares were thoroughly dry I stamped all the images using Black Archival Ink and heat embossed them with clear embossing powder.  Obviously, I couldn't get the whole 'monster' images on my little squares so I tried to make them look like they were peeping round corners.  I then coloured them all with a mix of the same Fresco Finish paints and Prima watercolour paints.  The little stars are coloured with sparkle Sakura pen.


I really enjoyed my first play with Elena's cute little monsters and think I need to add more to my collection now, lol!  

Have a good Sunday everyone!  I'm off to link to the challenge now.  See you again soon.

Hugs
Lesley  Xx


Saturday 15 October 2016

Quick Cards for Chocolate Baroque

Hi everyone,

I hope you're having a nice chilled Saturday and that the weather is being kind to you.

Today Judith on the Chocolat Baroque DT Blog is sharing a post full of quick card inspiration from the DT and it includes a couples of cards I contributed. 


For this first card I blended some Portfolio Pastels onto a piece of card with my finger then stamped the image with Black Archival Ink. I made sure it was dry by using my heat tool and this fused the ink into the pastels which was a nice effect but quite accidental, lol!  I stamped the sentiment onto my base card and embossed with clear embossing powder then I cut a rectangle to use as a mask so that I could randomly stamp the pretty leaf.  I stamped twice from each inking of the stamp then finally drew the squiggly border round the sentiment with a black fine liner.


I mounted the main image onto coordinating card then black card before attaching it to my base card.


For this card I inked up the lovely fern stamp with two different Distress Ink colours and stamped twice each time. I then inked up with two different colours and stamped again a couple of times.
 

I put a couple of drops of Distress Ink in two of the colours I used for stamping onto my craft mat then spritzed a little water before picking the ink up on an old toothbrush.  I then flicked the bristles to get the delicate spray.  I next used a dusting brush to add a little light colour to the background with also highlighted the edges and then stamped the sentiment.  Finally I added the ribbon and the metal leaf which I gave the Treasure Gold treatment to before adhering the whole thing to my base card.

These were both really quick cards to make (once I'd managed to think of them, lol) and if you hop over to the Chocolate Baroque blog you'll find lots more inspiration for using CB's gorgeous stamps from the rest of the DT.

Enjoy the rest of your weekend and thanks for dropping by.

Hugs
Lesley  Xx

Monday 10 October 2016

It's been a while........

......... since I had a project on the PaperArtsy Blog.

Good Evening everyone,

Because of family stuff followed by my surgery it's been a while since I felt able to commit to a project for the fabulous PaperArtsy Blog so it's a good feeling to have created a piece for the current topic of Die Cuts.  As always the introductory post from Darcy is brilliant.

If, like me you have loads of dies that never see the light of day (really should have a sale of some of them) it's good to be encouraged to dig some of them out and put them to good use.  There has been some fabulous inspiration on the PA Blog for the past week showing different ways to make use of dies and I think mine is perhaps a bit more basic but I was pleased with my finished project and did have fun making it.  Here's a sneak peek and if you would like to see the whole thing hop over to the PaperArtsy blog for all the details.


See you again soon.

Hugs
Lesley  Xx

Thursday 6 October 2016

For once it's not a card!

Hello again,

Wow, not often I do two posts in a week let alone two in one day, lol!  This time I have three ATCs made for a swap to share with you.


I tried to use up a few of the zillions of bits and pieces of leftovers I can't bear to throw away after making something.  The substrate for them all was corrugated card packaging I've been saving forever, lol!


For this first one I covered the ATC with a piece left over from my very first Gelli plate play, stamped with a small script stamp using Coffee Archival Ink followed by a PaperArtsy Ink and the Dog image with Black Archival and coloured small areas of it using pencils.  I then added some Christine Adolph adhesive rub on and gold foil and finally a piece of heavyweight Kraft card border which I sponged with Chalk Fresco Finish followed by Claret and then stamped with Gold Metallic Fresco Finish.  I finished off with Classic Treasure Gold around the edges. 


The second one was covered with a piece of paper brayered with a few shades of green Fresco Finish acrylic paint, a leftover from a recent project.  I created the impression of a hill with torn paper and sponged Archival ink then stamped the tree and foliage (stamps designed by my friend Deborah Wainwright who shares her fabulous art HERE) using more Archival Inks.  I found the honeycomb diecut in my scraps so added some Frantage embossing to it and then adhered it to the ATC along with a scrap of mesh.  Finally I inked around the edges with Olive and Black Archival Inks.
 

I started this third one by brayering over the corrugated card substrate with a couple of pink shades, Nougat and Taupe Fresco Finish.  I followed this with a little random stamping of a PaperArtsy small script stamp and Coffee Archival Ink. The beautiful Ophelia image had been stamped onto tissue and sprayed with Glimmer Mists (I think) at least two or three years ago, lol, so I decided it was time she was given a home. I adhered it with Soft Matte Gel  giving it a top coat of gel once it was stuck down smoothly.  I attached the ribbon and scrap of lace to the bottom and the flowers to the top then applied White Fire Treasure Gold to the flowers and round the edges of the ATC.

Thanks for visiting and see you again soon.

Hugs
Lesley  Xx

A Card for a Very Special Person in my life!

Hi Everyone,

A couple of days ago it was my beautiful Daughter, Jenna's 36th birthday.  Boy, does that make me feel old and where on earth are the years flying away to, lol!  Today I am sharing the card I made for her.

Back on the front cover of the September issue of the Craft Stamper mag Hermine Koster shared a card using Zig Clean Colour Real Brush Markers which I really liked and this is my take on that card.


I had bought a set of these lovely markers when I went to the Happy Stampers show at Port Sunlight back in May but hadn't played with them much so this was a good opportunity.  The stamps I used were a mixture of PaperArtsy (Lin Brown), Unity, Artemio and Indigo Blu.  I was really pleased with the clean, fresh look of this card although I have to admit to several attempts at stamping the teasels before I was reasonably happy.  Must practice more I think, lol!

Thanks for dropping by and see you again soon.

Hugs
Lesley Xx