Tuesday 30 December 2014

A Final Piece of Christmas!

Hello everyone,

Finally ....... a blog post!!!

First of all I hope you have all had a wonderful Christmas.  Mine has had some lovely bright spots when we managed to spend time with our children & grandchildren, courtesy of our Son and Yvonne, his lovely partner, who hosted us all for a fab Christmas Day dinner and then again on Boxing Day.  Yvonne's family were also there so it was a really lovely time.  We made it home on Boxing Day evening by the skin of our teeth because of the really heavy snowfall we had .  Half an hour later leaving and we would not have got through ........ which would not have been good for our little mutt who we'd left at home!

I am still spending a lot of time visiting my poor Mum who is still in hospital after her fall on the 4th November & broken hip but hopefully that situation will change in the next few weeks.

Anyway, this post has a dual purpose.  First of all to point you in the direction of the Craft Stamping Quartet blog I share with my buddies and below is a little peek at the project I just posted over there.  I'm quite proud of it so I hope you have time to pop over and have a look.


And for my final piece of  Christmas I have a few quick photos of some of the Christmas card designs I managed to make.


This last one I made to give to the staff (with a little gift) who have been looking after Mum for the past 7 weeks or so.  It was a bit hard to photograph as it's pearlescent card in ivory & pale gray.


Well tomorrow sees the last day of 2014 and I for one am not sorry to see it go.  I hope that 2015 is a better year for us all and I wish you all much health and happiness for the coming year.  Thank you all for your visits and comments throughout the past year.  They are very much appreciated especially when I have been such a bad blogger.  I live in hope of a much more productive year to come, lol!

Lots of love and hugs to you all
Lesley  Xx

Tuesday 18 November 2014

Phew ......I do like cutting it fine!

Hi Everyone,

I have a quick share today which is an entry I've managed to make for the Chocolate Baroque monthly blog challenge.   As most of my friends know we're having a particularly tough time of it in this neck of the woods because two weeks ago today my Mum had her second fall in 2 days and unfortunately broke her right hip so most of my time has been spent at the hospital since then as the Alzheimers is making Mum's care particularly difficult and the hospital do not have the staff to give her 24/7 attendance.  When I've managed to stay awake after late meal times every evening I've been so glad to retreat to my craftroom but it's been a bit heavy going so I'm really pleased I managed to complete this card almost at the last minute (challenge closes tonight).

I'm not going to give any 'how to' details today as I have the unenviable task of dropping in on a couple of nursing/care homes in preparation for doing battle with social services so here's my challenge entry.


It was early, raining and very dull when I took the photos so they're not very vibrant and the dusky mauve pearl contrast card looks grey in the pics but never mind.  I found this quite a difficult colour combo but am quite chuffed with the end result and the little bits of white highlighting on the baubles (and touches of white splatter on the inked base card which was intended, lol) just lifts it a bit.


I hope everyone has a more pleasant day lined up than me (visiting potential nursing homes & then Mum) and I just remembered it's mine and OH's 42nd Anniversary today .................. we both forgot until OH remembered late last night, lol!

Hugs
Lesley  Xx

Thursday 30 October 2014

Oh Boy, on my own this time!

Hello and welcome,

Thanks to you all for your visit by my blog especially if you've detoured via the fabulous PaperArtsy Blog.  For anyone that's come straight here, I was so chuffed to have the chance to share some Christmas cards, on the PaperArtsy Blog, that I created using the beautiful bauble stamps from Elizabeth Borer's stamps sets that I helped to launch at the end of August.  The main aim of my designs was to show people who are fairly new to stamping that it's relatively easy to create elegant cards with beautiful stamps and just a few other basic products.

Careful matting and layering with co-ordinating coloured cardstock featured on all three cards to create a frame to display the lovely baubles but there is only one card, as you can see, which uses the stamp as  traditional baubles.


Card #1  

 I stamped a 'flower' from the slim bauble by stamping in a circle and masking to create the illusion of petal layers.  I coloured the petals using Fibralo pens and then cut it out.  I also stamped, coloured and cut out a few individual baubles and after shaping them slightly with a bone folder I layered them over the flower with a little silicone glue.  


I often mock up my designs on scrap paper before committing them to cardstock and I'm really glad I did in this case as firstly I decided that my original was a bit too much (see below) and I also didn't like it centred on the card so the final piece was cut out and attached to one side as you can see and I trimmed some of the petals to fit to the corner.


I finished the card off with a metal flower and threaded narrow ribbon through a button and tied a dinky bow for the centre.  The sentiment is an Inkylicious stamp from my stash as I don't yet have any PaperArtsy Christmas sentiments.

Card #2

For this card I created a different style of flower using another of the bauble stamps.  This time I stamped in Versamark and embossed with a metallic blue embossing powder before colouring with my Fibralo pens and cutting each petal out.


To form the flowers I stuck a hole reinforcer to a punched circle of card (this made it easy to keep the petals balanced equally and also gave just a little dimension) and then arranged the 'petals' as shown below.


I created a co-ordinating card matt by scribbling the same colour Fibralos as I used on the bauble onto my craft mat, spritzing with water and then loading this onto a paintbrush to flick onto a sheet of card.  I dried each colour with a heat gun before applying the next one.


I used the same splattered card to die cut the snowflake rosettes and punch out some separate snowflakes and then dabbed them all with 'dries clear' glue before dipping into clear glitter.


Card #3

For my final card I love the shape of this bauble so wanted to use it in the traditional manner which meant I needed something to hang my baubles from.  I stamped out the beautiful art deco style mistletoe border twice and after colouring I cut them out and applied them to the card with 3D foam.  This time the sentiment is a Chocolate Baroque stamp.


 The baubles were shaped slightly from the back with the acrylic wire working tool you can see in the photo.  I've hardly done any wire work but that tool is so handy to have in my kit, lol!  I attached the baubles to the card with silicone glue to keep some dimension.


I created another layer of card to matt again scribbling Fibralos onto my craft matt and spritzing with water but this time I picked it up with a piece of natural sponge and dabbed it onto the card.  This is such a simple technique but very effective.


The photo below shows this layer perfectly and also the dimension to the border and  baubles.  Oh, nearly forgot to mention I put little dots of the Ranger white enamel stuff on the mistletoe berries and dots of white Posca pen on the baubles...... love my white Posca pen, thanks for telling me about them Sam ;-)!


So now I have three beautiful cards to kick off my Christmas card making this year ....... wow, that's early for  me so something else I have to thank Darcy and Leandra for, lol!  I hope you'll agree they do look rather elegant ;D!

Thanks so much Darcy and Leandra for letting me loose on the blog tonight and once again I hope I showed these lovely stamps off as they deserve.  I need to crack on with more Christmas cards now before I lose momentum, lol!

Thanks for your visit folks and if you haven't already been by the PaperArtsy blog do hop over as there's lot more fabulous inspiration as well as my cards.   See you again soon!


Wednesday 22 October 2014

Quick Post? Me???

Morning Everyone and thanks for stopping by.

I had a lovely day on Sunday at the StampMagic Show held at Doncaster Dome.  Lots of fab exhibitors including my favourite, PaperArtsy, but also it's the perfect opportunity to meet up with quite a few of my Twitter and Facebook friends and have a good catch up.  I'm useless as taking photos on these occasions but if you would like to see some nice ones hop over to my friend Sam's blog where she posted some smashing ones.

And ...... speaking of Sam, yesterday was her birthday so I can now share the card I made for her.  I had planned on making something painty and inky last week but life threw a bit of a curve ball and it was Saturday evening before I got chance to make her card, hence it ended up in CAS style. 


I diecut two of the Tim Holtz/Sizzix leaf sprays from different shades of green card (green is Sam's fave colour so she ended up with lots of green cards from her crafting friends, lol) stamping a PaperArtsy script over the top layer.  I then layered one over the other before adding to the card.  I matted and layered onto the base card and stamped the sentiment which is a lovely Chocololate Baroque stamp.


When I'd finished I thought the top layer didn't have enough definition so I used a toning green pencil to carefully add a fine outline all the way round.  It's hardly visible but definitely had the desired effect I think and created more dimension.
 

At StampMagic Darcy and Emma were giving fab demos on the PaperArtsy stand and Darcy showed us how to make a sheet of copy paper with Fresco Finish paints and PaperArtsy stamps into the gorgeous bow you see above, which she then very kindly gave to me along with the strip left over.  So, when I got home I created the little card and gift tag using the scrap piece.  I used Darcy's set shown on her blog as inspiration and she is going to be making a little video which I assume will be added to the other brilliant PaperArtsy videos, showing how to make the bow.  I'm really glad about that as I want to make some myself and can't remember the measurements for cutting the strips, lol!

That's my blog post for today and I now need to get some chores underway.  I have Grandaughter Alexa coming for TWO (she keeps stressing the two to make sure she's not short changed, lol) sleepovers at the beginning of next week and then Izzy and Charlie for two nights at the end of the week.  There definitely wont be any blogging next week that's for sure, lol!

Till next time..............

Hugs
Lesley  Xx

Monday 13 October 2014

'Morning Monday ........ here's a bit of cheer!

Hi Everyone,

I really, really hope not many of you have the horrible weather we have here this morning but I think if you're in the UK we're all in the same boat!  It's dark, rainy and very blowy .... roll on the weekend when we are supposed to have a mini heatwave!  At this time of the year that won't be mega hot so I will be able to enjoy it if it happens, lol!  Anyway, I have a quick tag to share today which I hope adds a bit of cheerfulness to your day.

Regular visitors may remember at the end of August I spent a lovely weekend with my PAtwit buddies and the equally lovely Lin Brown where she taught us many things and we got the chance to play with lots of stuff new to us.  On the Sunday we all made lots of tags using different products and techniques but as usual I didn't finish any of mine at that time.  Having a bit of a tidy of my workdesk this weekend I found the pile of tags which I'd covered up to protect them from the lethal sunlight in my craftroom (aka conservatory) and this is the first one I decided to finish off because it made me smile and sort of summed up the way the weekend made me feel. 

Lin's friend Karen shared the workshops with us and kindly brought in her full set of Spectrum Noir pencils for us to have a try with so I'd stamped some PaperArtsy images from the latest smashing Darcy sets (hoping to buy these next Sunday ;D) and started the colouring but didn't finish it.  I did like the Spectrum Noir but can't really say I saw any difference between them and my Derwent Coloursoft.  I would love a full range of pencils though but no idea which to choose ...... I see lots of people singing the praises of Polychromos (spelling?) and Prisma.  If anyone has a preference or can tell me the difference I'd love to hear what you think.

Anyway, I'm waffling again, lol!  I used my Coloursoft pencils and Derwent blender pencil to complete the colouring on my tag and added a bit of background stamping using a couple of my JoFY sets from PaperArtsy.  I stamped out the words from some cheap little peg alpha stamps I bought in the supermarket years ago, doodled round them and cut them out to complete the tag together with a bit of ribbon and some paper covered wire.  The wire is my latest Eureka! buy as I've wanted some of it for ages but could only find it online until last week when I visited a local wholesalers and found a big roll of it in their floristry section.  It will cerainly last my lifetime I think, lol!


I hope my tag cheers up your Monday morning.  See you again soon.  Oooh yes, nearly forgot it's the StampMagic show at Doncaster Dome next Sunday........can't wait!

Hugs
Lesley  Xx

Tuesday 7 October 2014

Last minute card request from my Other Half!

Morning All,

Ppfft!  We are certainly back down to earth with a bump as far as the weather is concerned aren't we?  I do not mind the drop in temperature one bit (except of course for the heating bill) but this miserable 36 hrs+ of rain can take a hike.....had enough of it for a few days now, lol!

Anyway, I have something to share today somewhat sooner than I thought I would as yesterday Hubby asked me if I could make a card for him to give to the physiotherapy team at the breathing clinic he's been attending for the past 6 weeks. Of course, he leaves it till the last minute to ask me as tomorrow is his last session, lol! 

I have become a Pinterest addict and I pinned this lovely card to my CAS board from HERE which gave me the inspiration for my card below.  Gayatri Murali has a lot of style!


This card was a pleasure to create but deceptively tricky to get the positioning of the cut out and the stamped image balanced but I think that's true of 'clean and simple' style cards in general and because of their CAS style there is no hiding place for stamping errors, etc., lol!  I think it's fairly obvious how it was made but if you have any questions please ask away.  The lovely dandelion seeded head image is an IndigoBlu stamp and I used Archival Aquamarine to stamp it.  I can't tell you whose the embossing folder is because there is no name on it and I keep very little in the packaging ...... not enough space in my craftroom as it is without packaging, lol!

Wow, that's short and sweet from me today after my long post last time ;-).  Thank you for all the lovely comments on my box, I really appreciate every one.  Off to get some less enjoyable tasks done now before a visit to check on Mum.  See you again soon.

Hugs
Lesley  Xx

Sunday 5 October 2014

PaperArtsy Blog Challenge..........but I missed it :-(

Hi Everyone,

I hope you all had a lovely weekend, especially my buddies who were lucky enough to go to the Happy Stampers North West show at Port Sunlight.  I love that show and the venue but it's a loooooong drive from here so means an overnighter which I couldn't run to this year sadly but from tweets and blog posts I know they all had a fabulous time.  Instead my OH and I met our Son and grandaughter Alexa and went to see the illuminations and fireworks at Matlock Bath.  Luckily after a bad start to the day the weather decided to be kind and was dry and not really cold (although OH reckoned it was) but there is a lot of hanging about and queueing and even we got bored let alone Alexa, lol!  Never mind we did have a nice meal, the fireworks were good and it was lovely to spend time with them.

Last month saw a change in the way the blog challenge works over on the PaperArtsy blog and instead of weekly it is now monthly.  You would think that would give me more time to make an entry but it didn't seem to work that way for me.  I got bogged down with all the wonderful inspiration from Guest Designers, Signature Designers, Guest Bloggers, etc., and right at the last minute the lovely Lin Brown shared a project HERE which involved metal work (at which she is simply The Best) which I really wanted to have a go at.  I made a start but knew I had no chance of finishing it in time so it got left on my workdesk all last week.  I really wanted to finish it though and so I spent today doing just that.

I had a framed canvas like the one Lin used but mine was much bigger but then I found a fab box with a canvas to set into the lid.  I'm pretty sure I bought this from PaperArtsy at one of the shows and although it's still 2 cm bigger than Lin's square that just gave me scope to change it a little.


I removed the clasp and hinges before I started working on the box.
 

This is the metal adhered to the canvas square but before adding Fresco paint and Treasure Gold
 

Painted, buffed off and then the beginnings of adding Treasure Gold.  At this point I thought what a bl.....y mess!
 

Finished with the TG but not polished.


Polished off, corners added and attached into the lid recess. The Treasure Gold colours I used were Sapphire, Onyxite and Royal Amethyst.
 

I toyed with the idea of adding stencilled Grunge Paste or lots more stamping round the sides but decided against it as I liked the whole focus being on the metalwork, so I just stamped one of Lin's quotes  and highlighted with some Treasure Gold.


I lined the top and bottom with pieces of PaperArtsy's Chatsworth paper over which I'd added a wash of Fresco to tone it in with the Baltic Blue and Squid Ink Frescos I'd used.  I don't yet have Lin's new limited edition paints for the gorgeous colour she used but hope to rectify that in 2 weeks time at the StampMagic show ;-). 
 

I'm really pleased with how this turned out in the end especially as at one point I thought the metal looked awful, lol!  Must try harder this month to get a project finished for the October challenge.  I love tonight's canvas from Gillian and my buddy Helen did a lovely journal page the other night......however, I don't do journalling, lol!  Could always do a tag instead perhaps!

Whatever, have a great week everyone and see you again soon........ hopefully with a shorter gap between posts than the last one, lol!

Hugs
Lesley  Xx


Saturday 13 September 2014

Two Birds with one stone?....... but I hope I haven't killed them, lol!

Hi everyone,

I've had very little time for crafting so far this month as various family commitments have filled up my time.  Last night I returned from two delightful days of looking after my youngest grandchild, 2 yrs 9 mnths 'know no fear' Charlie!  He's been an absolute delight for me to look after and I think his Daddy must have worn him out with energy requiring persuits in the first half of the week as he just wanted to sit for cuddles and watch his current favourite films ....Mr Poppers Penguins and Hocus Pocus.......with me and then after school there was double pleasure when big sister, Izzy came home.  Do love my littlies (although not little for much longer :-(  ) sooo much!

I had been wanting to make an entry to this month's Chocolate Baroque Challenge so last weekend I finally made a short time to play with my new Brushos (only had them about 2 months, lol) I ended up with one piece that I thought I could make use of to fit with the colour inspiration and as I needed to make a last minute birthday card I 'killed' two birds with one stone so to speak.  Debs, who creates some beautiful art and shows it HERE, had her birthday last Tuesday and I didn't know she was going to be on holiday for two weeks so still hasn't seen my card but we've swapped messages this morning and she's told me to go ahead and blog the card and she won't look till she gets home, lol!

This was a piece I decided to save after mopping up some of the Brushos from my craft mat.......they are gloriously messy, lol!


And this is the card I made I made from it.

What I couldn't capture in a photo is the 3D glaze I added to the 'light bulb' centres.  I just hope it was properly 'cured' by the time it went in the post as it was quite thick.  All the stamping was done with Versamark and embossed with Wow Bright White embossing powder.

The butterly was stamped onto the same original piece of card but on an area less covered by ink spodges.

All the stamps are from Chocolate Baroques lovely Steampunk collection.

See you all again later this week hopefully.  Have a good weekend all!

Hugs
Lesley  Xx

Sunday 31 August 2014

And more fab PaperArtsy ....but this time just for fun & guided by the wonderful Lin Brown.

Hello again lovely visitors!

After the excitement of being part of the launch of new stamps by a brand new designer, Elizabeth Borer, over on the PaperArtsy blog last night I now have something to share from my fabulous weekend away with a lovely group of PATwits and learning from the awesome Lin Brown.

As I'm so slow and always way behind the others, I never get time to take pics on the day so leave that up to my buddies Sam and Helen (they take better pics than me anyway, lol) but we had an absolutely wonderful time and Lin Brown is a brilliant artist & teacher (and a lovely hostess into the bargain) and I love making things under her guidance.

On the Saturday we made a beautiful Lin Pirella chipboard mini album.  Lots of Fresco Finish paints, gorgeous Lin Pirella stamped images, stencils, colouring in with paints and/or pencils and it was fabulous!   Of course, I nowhere near got mine finished and I didn't get chance till last night to do so but I've taken lots of photos to show you the lovely details.  I had to change mine a bit when I got home because I realised I hadn't thought enough about which 'pages' were going next to each other and which of the smaller shapes were being attached to which of the larger ones so some of the colours were wrong and/or they were too busy. It doesn't matter though, just means it's not an exact copy which is good, lol!

Okay, off we go ........here come lots of pics!

The gorgeous front cover with my absolute favourite Lin Pirella image!
 

Inside front cover


The smaller page should have been attached to another page but the colour was soooo wrong, lol, so I made it into another mini page.


Opened out to show back and front covers.
 

So there you have it!  I did enjoy colouring all those images with a mix of Fresco Finish  paints and coloursoft pencils...... so relaxing!

On the Sunday we had a day playing with all sorts of different media onto tags none of which are yet  complete but I'm going to have a lot of fun turning them into finished tags that I can show you another time.

See you again soon.

Hugs
Lesley  Xx

Saturday 30 August 2014

and .....BREATHE!!!

Hiya Everyone,

Well, I can finally breathe as the cat is out of the bag, lol!  For almost a month I have had to not let slip the fact that PaperArtsy HQ had asked me if I would like to do a couple of projects for the launch of their new designer, Elizabeth Borer's pretty stamps.  What me???? Nah, course I wouldn't!!!  I did actually hesitate slightly but only because I would hate to let them down by not coming up to scratch with the projects...... and my makes were being shown alongside the talents of Elizabeth and Penny Nuttall ....Ooooer!  I hope I didn't let the side down and that you like what I created.  If you go HERE to the PaperArtsy Blog you will be able to see my projects but more importantly Elizabeth and Penny Nuttall's fabulous designs too.  Not only that but all this past week Leandra and the DT have been showcasing some fantastic new stamps from the wonderful designers on the PaperArtsy team so there is oodles of awesome inspiration to keep you going for an age.

These are the lovely stamps and although they are very different from the rest of the PaperArtsy ranges I think they fill an important niche.  Now this is going to be a long post so make yourself comfy, lol!

EDIT  Now the launch has gone live the stamps are on the website and if you click on the images you will be transported to the wonderful PaperArtsy shop.

Eclectica³ {Eizabeth Borer} 01


Eclectica³ {Eizabeth Borer} 02

My first project is an MDF heart (stamps from EEB01). 


Now silly me, I was so engrossed in the actual projects I completely forgot to take step by step photos so I hope you can understand my explanations from close up pics.  The first one, obviously taken in the garden wasn't very successful because the sun was so bright it drained some of the delicate colouring from the main image but she looked so nice against her ivy backdrop!


I started by painting the heart with Pea Coat Fresco Finish and on the left side I smeared some Grunge Paste which I then stamped into with the trailing ivy.  On the right side I applied PA Crackle Glaze.   When it was all completely dry I covered all of the surface with a blend of Sky, Antarctic and Snowflake Fresco.


I then used my lovely new Fibralo pens from PaperArtsy to colour in the ivy trails including those stamped in the GP and then highlighted those with Pewter Treasure Gold as well as right round the edge. 
 

Next I stamped the beautiful Ivy Fairy in her bower onto watercolour paper and, scribbling the Fibralo pens onto my craft mat, I watercoloured her.  I also painted areas of her wings and dress with PA Matte Glaze and sprinkled with Glamour Dust .... one of my rare concessions to glitter, lol! I included this photo because I think you can just catch the faint glitter sparkle, the hint of TG and also the sheen on the die cut flowers but after I took the photo above I decided there was not enough colour to her skin nor the 'sky' background so I added a little more which was a big improvement.


 The diecut flourishes were coloured with Fibralo pens and for the diecut flowers I made my own mica sprays with Fresco Finish paints, water and mica powder and sprayed onto Heavy Duty PaperArtsy Smoothy paper.  I was so chuffed with these sprays! I also used them to colour the chiffon ribbon.


So there you have my pretty Ivy Fairy who could be displayed anytime of year.


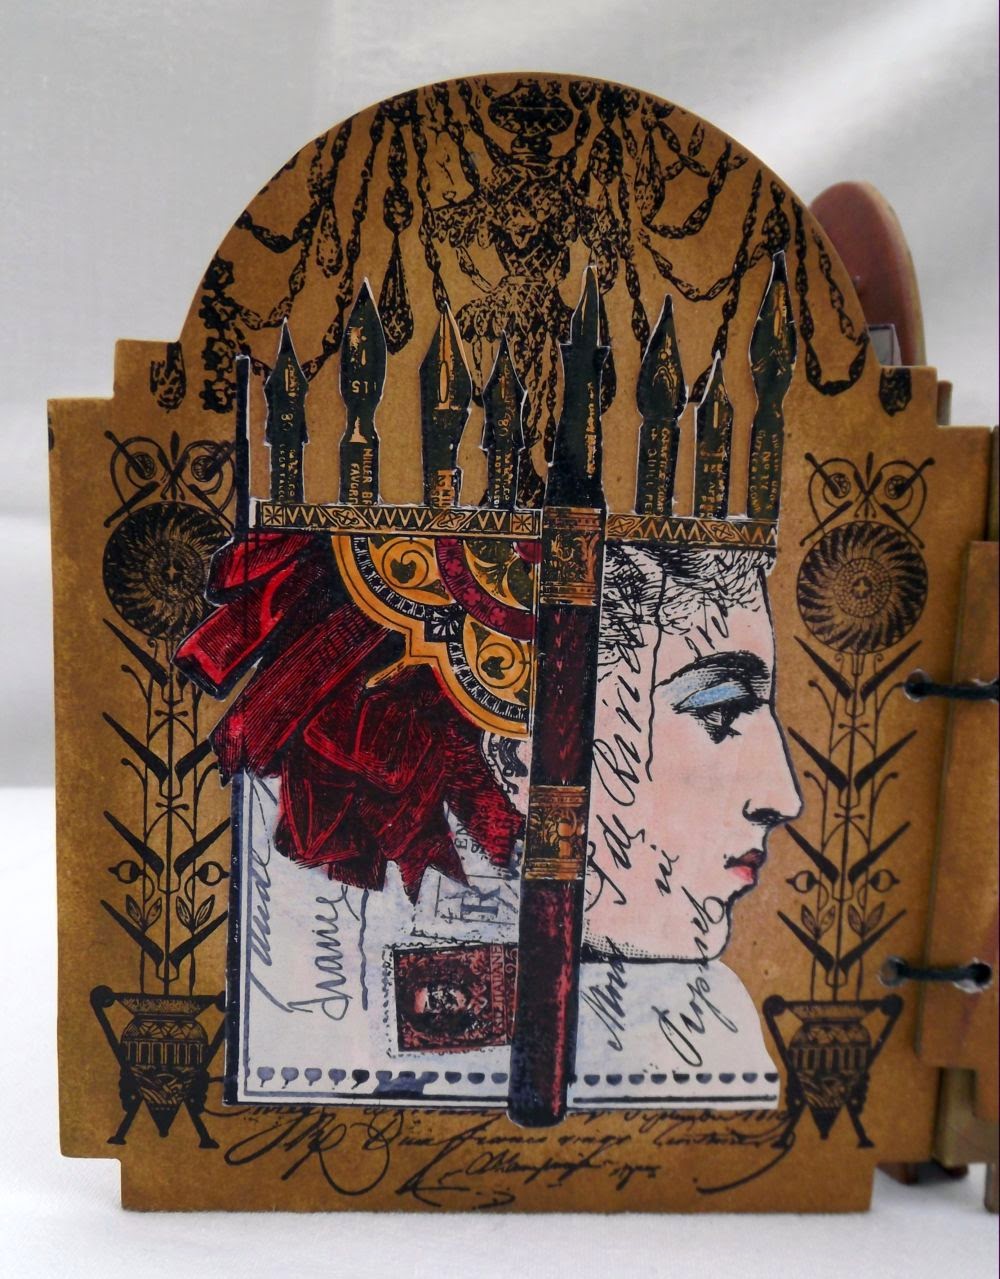
My second project is a small luminary (stamps from EEB01 and 02)


I was having a little tidy up and found this wooden luminary frame hidden behind other stuff.  I can't remember who the kit is made by but when I got it it was badly cut out on the corners so took me ages of carving bits out to make it fit properly.  Once I managed that I had painted it with Pea Coat Fresco Finish and then it got left. 


As soon as I found it I knew it was a perfect showcase for Elizabeth's new stamps and would make a lovely decoration for Christmas too!  I repainted it with a mix of Claret and Little Black Dress Frescos and then sanded it back to reveal some of the dark blue and bare wood. 


I then took the lovely trailing ivy and stamped with Versamark without a block so I could work it round the corners and then heat embossed with gold embossing powder.  I rubbed the metal corners and some wooden beads for feet with Classic Treasure Gold to tone them in but didn't attach them until after the panels were in place. 


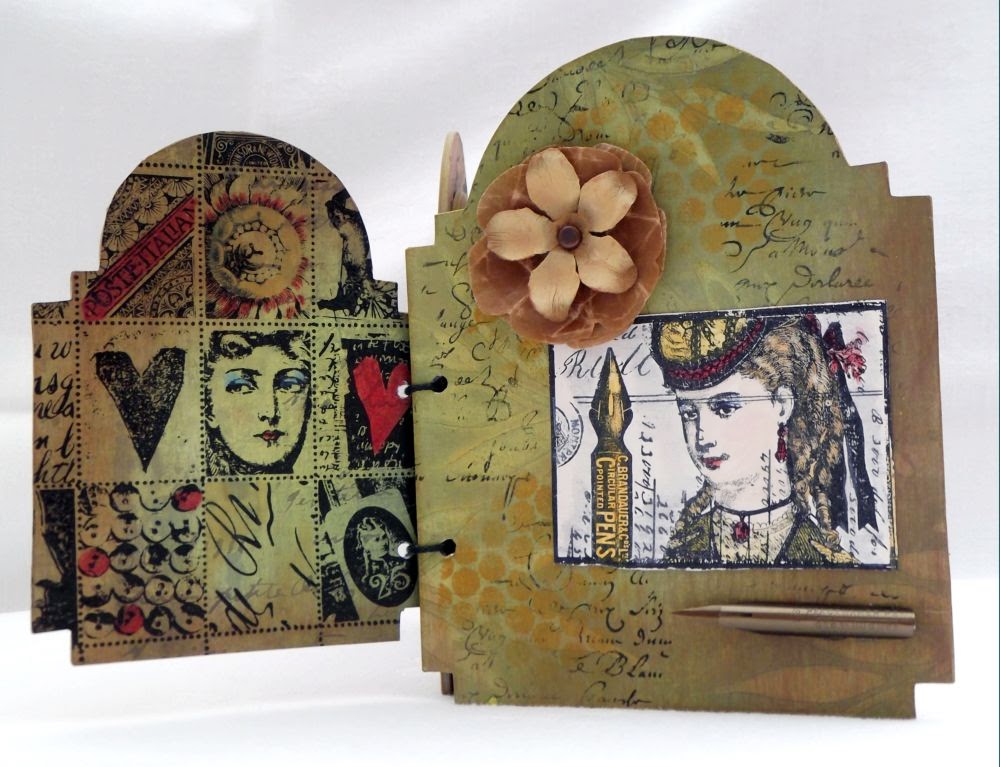
I cut four heavy vellum panels to fit and then stamped them with various images from the two stamp sets. I coloured them on the reverse with watered down Fresco Finish paints and added subtle sparkle on the front surface (as on the circle frame and wings above) with a Sakura clear sparkle pen. I fixed the panels in place before attaching the feet and corners.


Here are the panels with a fake candle inside.  I wish I could capture the true effect as it really does look quite pretty.  Even my OH loves it!


 On the above two panels I did some masking to layer up those lovely baubles and then drew in the hanging twine with a fine black Pitt pen.  Again, after painting the images on the reverse I added Sakura sparkle to the baubles on the front.


(must have had the shakes when I took the above photo cos it's a bit blurred, lol! Must remember to take more water with it ;D)


This was my favourtie of the two projects but I had so much fun doing them both.


Thank you so much PaperArtsy for asking me to play with your new stamps and for Elizabeth Borer for her lovely designs.  I was very honoured to be asked and hope that my projects have given the stamps the showcasing they deserve.

Thanks for visiting me today and if you haven't already been over to the PaperArtsy Blog please give yourself a treat and visit.  There had been so much beautiful artwork all week and so much variety there's bound to be something to make you Oooh and Aaah!

See you again soon.

Hugs
Lesley  Xx