Sunday 20 January 2019

General catch up of makes with new stamps

Hi again,

I've had lots of treats of new stash over the past 4+ months and barely scratched the surface of using them but I'm trying hard, lol.  Today my post is a catch up of the none Christmas makes I've managed recently.


My first piece is a tag (obviously, lol) created using one of the fab AALL & Create stamps by Tracy Evans plus one of their stencils.  I made this last year and I think I had already done a blended background on the cream tag and had it lying around on my desk.  I have absolutely no idea what inks I used for the background, lol!    I did some stencilling and background subtle stamping.


 I stamped the flower onto the tag and also separate card then coloured it.  I think I used Amsterdam Inks and then added the white doodling, cut it out and added it to the tag.  Finally added extra word stamping, doodled round the edge with a black fine liner pen and added the word sticker.


I created this card about the same time as the above tag, just trying out the gorgeous new stamp.  It's a large A4 stamp so you have to practice a bit to get to know how best you can stamp with it.  I'm usually pretty good but this time I moved the card and smudged the image a bit but I didn't want to waste it so went with the flow, lol.


 I think I must have used mica powders to blend over the background then I stamped the butterfly onto separate card and coloured it and the flower with metallic watercolour paints.  I added some thread before sticking them to the card then stamped and cut out the words.  Matting and layering to the card base and finito! 


  Back in November I went to the Knit and Stitch show in Harrogate and I bought a set of Brusho SprinkleIt powders but it took me till after Christmas to try them out.  I'm not sure they are worth it yet and if you are a lover of 'in your face' bling I would say these are not for you but I only like subtle when it comes to glitter and sparkle so I think with more play time to get to know them better I might get to enjoy these.  I used one of my try out backgrounds for the card below.


 This background is created with normal Brusho crystals very sparingly sprinkled onto damp card then spritzed.  I dried between each colour application and finally added some of the pearl SprinkleIt to the last layer.   I stamped a chosen area from a gorgeous new A4 AALL & Create stamp and then added some white texture paste through two different AALL & Create stencils but forgot that with Brushos being water reactive the paste soaked up colour from the background.  To make the texture more visible again I used Treasure Gold to highlight, copper on the circles on the left and a ruby colour on the textured areas on the right. 


 I added a tiny bit of colour to areas of the butterfly and some white doodling and a few white paint splatters then did a bit of tinting to one of Tim Holtz Paper Dolls before adding her to the piece.  A bit of graphite pencil to create shadowing around her made her stand out a bit more and lastly I stamped the words to cut out and add.  I edged the piece with black and matted and layered onto the card base.


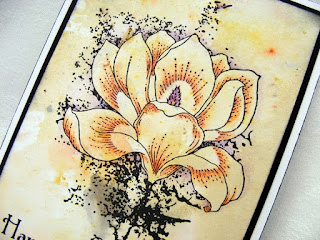
 My final share today is using a new stamp from Chocolate Baroque.  I think it's quite stunning.  I used another of my Brusho and SprinkleIt test backgrounds and this one has one of the very subtle glitter powders on it.  If you click to enlarge you might be able to see it.


I loved this background as it's not often I can get 'subtle' with Brushos as the colours are so intense.  I didn't want to cover it up with too much colouring of the image so I just did some shading with Polychromos pencils in specific areas and was so happy with the result.  I also added a light shadowing around the image to give a little dimension then stamped the Chocolate Baroque sentiment and inked with black around the edges.  Matting and layering to complete the card.
 

 Right,  I think that's me caught up although I could have missed a couple of makes I've forgotten about, lol.  I must try harder to be more productive, lol, as I still have a lot of as yet unused new stash to play with.    I'm not promising but I'll try to keep up better with blogging, lol!

Hugs
Lesley  Xx


Saturday 19 January 2019

More Christmas makes......just when you thought it was all over, lol!

Hiya, I'm back again with my VIP cards this time. 

These were all created in my favourite 8 x 8 format and were all very different but first I'll share a mixed media tag I made for a swap in a Facebook group I belong to.  If you need a bit of inspiration sometimes (I think we all do) and/or enjoy different swaps this is the group to go to.  https://www.facebook.com/groups/ukstampersforum/


I had cut a large tag from corrugated card and stripped some of the paper off the top before trying out a bit of Finnabair's patina pastes and it had been lying on my desk for weeks so I covered it with gesso and inked the edges black.   I stencilled stars using clear texture paste to which I added sparkly embossing powder.  Across the bottom I stuck some snips of Angelina fibres and film.   I then did some die cutting on the trusty Big Shot (love mine) and assembled lots of embellishments including berries, flowers (to mimic Christmas roses again), a star and lovely lamp post.  I used some Seth Apter Baked Texture embossing powder on the lamp post and loved the effect.  


 A fair bit of sparkle (for me, lol) was added to other bits and bobs like the deer, the star and number 25


I then decided to add some metallic watercolour paint around the lamp area.....now why didn't I do this BEFORE I stuck the lamp post down, lol!  Finally I stamped the wording, cut it out and edged with black before sticking them to the tag.

Now for the cards.......


I was so pleased with the tag above and hubby loved it too so I adapted the design to fit an 8 x 8 card for my lovely Son and Daughter's families.  The techniques used were exactly the same as for the tag except I didn't use corrugated card and I added some natural sisal to the arrangement of embellishments at the bottom.


Another 8 x 8 card but this time a clean and simple design.  I used a beautiful snowflake stamp by IndigoBlue and added guilding flakes before matting onto green card and then onto my card base.


  I stamped the sentiment using a green Distress Oxide ink and clear embossed then matted onto the green card.


8 x 8 again for this third one but totally different to the other two.  I had this gorgeous 12 x 12 sheet of designer paper from a pad I bought years ago.  I loved it so much I couldn't bring myself to use it which was daft because it was tuck in a box unseen by anyone.  During my clear out last year I rediscovered it and vowed it would get used so I cut one corner into 8 x 8, edged it with gold pen and matted onto co-ordinating card before sticking to the card base.  It already had some subtle fine glittering so I didn't add anything else to the paper.


I gave two of the Anna Marie birch bark stars touches of gold pen and die cut some stars from another designer paper, edged them with gold pen and adhered them all to the card.


Finally, I stamped the sentiment and words onto scraps of the dp and stuck those to the card and stars.   I absolutely loved this card and the vintage look of it when it was finished.


And the last one (don't cheer, lol)!  Another 8 x 8 with the top layer matted onto co-ordinating dark blue card.  I centred a circle mask over my card and blended some blue ink in from the edges, slightly more at the top.  I then used one of my favourite Chocolate Baroque Christmas stamps which is a complete little scene in one.  I stamped with Claire Versafine Twilight and then used some blue ink and a brush to lightly watercolour the image a little. 


 I added highlights with clear Sakura sparkle pen and stamped the CB sentiment.  Finally I stamped the pine branch onto separate card and clear embossed before cutting it out and arranging a little cluster of berries, flowers and pearls on fine filament.


It is quite funny that from not having a clue where to start with my cards for last Christmas I ended up making some of my absolute favourites.  Hope you liked them too and maybe they'll give you a bit of inspiration if you remember them when you start yours for Christmas 2019.


My next post will be a part catch up on general cards and stuff but I'll leave those for another day.

Hugs
Lesley  Xx


Can I throw my hat in.....long overdue post.

Hello everyone or should I say anyone who somehow notices that I blogged 😉

Well, I have gone even longer between posts than last time I think and as a consequence I am sure I have missed taking pics of some of the things I created in the meantime but for my own records (as the old memory is not what it used to be, lol) I'm going to catch up on the ones I have got.  It's going to mean a couple of long posts so sorry if you find them too boring to stick with....as I said posts are really for my own benefit now as I've 'retired' from DT work, lol!  You can always just enjoy the pics!

Okay, I'm going to make this post all about the Christmas creations I made for 2018.  I found it quite hard to get motivated for Christmas last year (gawd, that sounds so long ago, lol) so to try and get in the mood I recycled an old chunky little canvas and created a piece of home decor.


 If I remember correctly I used PaperArtsy's Fresco Finish acrylic chalk paints to create an hombre effect background.  I then stencilled some clear texture paste and sprinkled silver embossing powder whilst it was still wet.  Once it was dry I heat embossed and then I used more acrylic paint to stencil the tree and added a bit of sparkle down one side.  I added some silver embossing to the star (from Anna Marie) and did some die cutting for the flourishes and some foliage.


I selected some berries and tiny pine cones (again from Anna Marie) and a few white flowers from my stash which I thought looked like Christmas roses.  I always think of my lovely late Mother in Law when I see Christmas roses as she had some in her garden and always gave me a little bunch for the Christmas dinner table.  I arranged all the embellishments, stamped and cut out the words and added the metal star to the tree.  By the time I finished I really loved this little canvas.

Next came the Christmas cards.  I'd left it so late I'd almost decided to buy some ready made cards but my guilty conscience got the better of me thank goodness.  I started out with some small batches of relatively simple scenic cards.


This first set used up lots of the offcuts I end up with after making my favourite 8 x 8 cards bases and I rather like the elegance of the DL format.  I used a mask and blending brush to create the soft snowy hillocks and then used a tall elegant Lavinia tree stamp and Claire Versafine Twilight, 1st, 2nd and 3rd generation to stamp the trees.


I stamped a Chocolate Baroque sentiment  and finally stencilled a star with clear texture paste, sprinkled embossing powder and left it to dry before heat embossing.  Who saw the optical illusion I inadvertently created as soon as they looked at this card.  I'll own up, it wasn't intentional but it's hard to decide whether the palest tree is in front or behind the middle tree, lol.  I've decided it's a poorly tree that is falling backwards 😜!


This second batch is created in a similar way to the previous one except I used a smaller Lavinia tree stamp and changed it to a square format.


I also stamped matted the 'topper' onto a slightly larger square base card, edging each one with a marker first.  I also added some subtle Stickles sparkle to the front tree.


This third batch was created by stamping the trees directly onto my square card base.  Sorry I can't remember who the stamp is by and I've packed them away for now, lol.  I then stamped again onto some of the Christmas designer papers I have in my stash and decoupaged them onto the card base. 


 The sentiment stamp makes up the set with the tree stamp and I cut it out and edged in black before adding to the card.  The little snowy mounds are from a Hobby Art set which is coming up in the next set of cards and finally I added red Stickles to the baubles.


This final batch of cards was created using a lovely fun set of stamps from the equally lovely Jenny Mayes (Hobby Art).   I bought them at the Happy Stampers show in Port Sunlight last Autumn because I fell in love with this snowman.    There are a total of eight stamps used in this little scene and typically I forgot I could have used my stamping platform, lol!  I really enjoyed making these though and stamped the scarf and nose and the little pile of snowballs onto separate care to colour (with pencils) then cut out and decoupage on 3D foam.


  The little heart is glazed with Glossy Accents and I added sparkle pen here and there and blended some blue ink at the top. Finally I edged each topper with a marker pen in a colour to co-ordinate with each snowmans scarf.  

So, they were all the small batches I made and I'm so glad I didn't give in to buying cards because, as usual, they were a pleasure to make and helped set the mood for Christmas.

Next post up will be what I call my VIP cards so come back later if you can.

Hugs
Lesley  Xx