Tuesday, 21 November 2017

It's a Dickensian Christmas at Chatsworth House!

Hi Everyone and thanks for you visit today,

ALERT!  This is a mega photo heavy post and has only a passing connection to crafting AND there's lots of things Christmassy so, if you decide to stay for a browse I'd grab a drink and settle in, lol!

Last year Hubby and I visited Chatsworth Christmas Market for the first time and were quite impressed even though it was raining most of the time but we didn't go to look round the decorations in the house.  This year we decided to book a time slot online.......not a bad idea as it saves you a parking fee 😃f as well as guaranteeing you a place.  We decided to try and get there as early as we could, even though our house visit wasn't till 3.15 pm, so that we weren't parked too far away as we are not too agile these days and it does get a bit claggy underfoot when it's damp (which it was).  They do have some 'golf cart' type buggies driving around to ferry people though which is a big help if you're prepared to wait for them. 

The house this year, is decorated in a Dickensian theme and I have to say it is stunning.  Unfortunately we had a mishap with the camera.......I remembered to put the battery on charge the night before and thought Hubby had put it in the camera as he'd taken it from the socket.....WRONG! I had picked up a battery empty camera so I had to resort to my phone and whilst they are not the best pics in the world I was surprisingly pleased with them.  I haven't done any tweaking with the light or anything because I thought it would spoil the atmosphere in the house and market.  It was a very gloomy day and did rain several times so we got a bit damp and chilly waiting for our time slot after lunch.  The restaurants get mega busy so you have to be patient if you want to eat indoors but there are loads of fresh foods available outside....the hog roast aromas were driving my senses potty all day, lol! 

Now I'll move on to the photos which you can browse or skip as you will........

Straight away you are greeted with FOOD!


Loved the wicker animals on this stand but the magnificent stag below was my favourite.  Not surprising given the price tag of nearly £500!
 

And more food!  There were at least two hog roast stands, plus lots more eateries and the smells were driving me mad all day.  I love a proper hog roast!
 

Really pretty paper light decorations.
 

Lots of quality handcrafts of all kinds from decorations, clothing (sewn, knitted) some of it way out of my price bracket, lol, handmade soaps, pottery, woodwork and much, much more.  There was also some beautiful jewellery, toys, metal garden ornaments...I fell in love with some metal robins which I forgot to take a pic of but now I do wish I had bought one, lol!


Above is looking from about half way up the market to the top and below is looking back out over some of the park land and you can see the car park filling up in the bottom right corner.


This lovely organ grinder lent a very festive atmosphere if you stopped for a nice drink of .....whatever took your fancy.


Garlic anyone!


Or do you prefer a little tipple.......
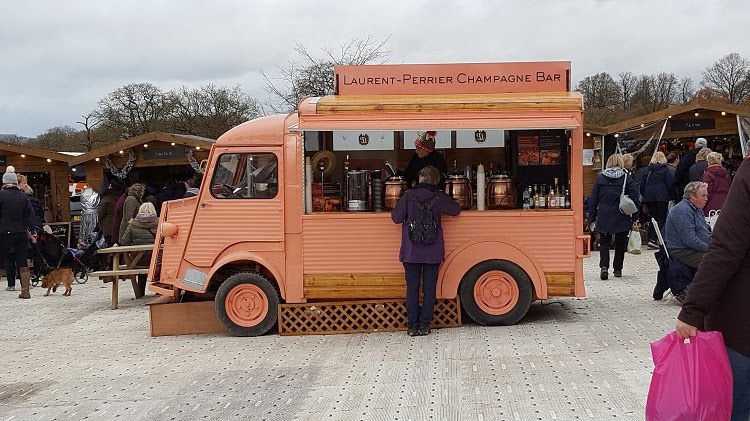

The pic below gives a better idea of how busy it was but it wasn't that busy as to be uncomfortable.


My tipple of choice was a lovely hot chocolate with a measure of Baileys....delicious!  The chappy asked if I would like a spot of rum in it too but I was driving so thought I'd best not, lol, even though  I did have lunch and several hours before we were setting off for home.


On our way into the house now and the walkway was lined with these lovely character silhouettes.


Here's Hubby lighting Ebenezer Scrooge's candle for him.


The first beautiful tree in the marquee where we waited for staggered time slot.


The entrance hall (North Sub) is dedicated to Dickens use of words many of which he invented.  I like sassigassity .....  audacity with attitude!  Many of my crafting friends would have appreciated this as it was covered in books and book pages.......


.....including the tree!


Below is the Chapel Corridor dedicated to 'A Christmas Carol' 


Loved this beautiful wall decoration


After walking past the 'shops' and round the corner you find the door to Scrooge and Marley's business premises.


Then into the Chapel and the Ghost of Christmas Present...  Look at that ceiling!


Next is The Old Curiosity Shop and some weird and wonderful 'trees' including this fabulous upside down one.


Followed by A Tale of Two Cities.....


Now on towards Dickensian London but watch out for one or two scoundrels, especially this one who will charmingly kiss the ladies hands .....while 'lifting' their jewellery 😉


AND THIS WAS MY FAVOURITE BIT!  A London scene created from bookpages!  Absolutely wonderful although I think I would have scruffed it up a bit with some distressing, lol!


And into the Painted Hall where you can hear a blackbird singing


You can see why it's the Painted Hall with this stunning ceiling!  


It's a bit gloomy and smoky depicting dawn breaking in London


and here is the gentleman himself, Mr Charles Dickens.


Hubby making his way up the staircase to the stunning tree at the top.  I waited ages to try and get an unobstructed pic but there were too many visitors.


The pic below was taken from the little balcony you can just see to the left of the staircase.


And on into Fagin's lair and a Christmas tree made of beds for his little band of urchins.


Below is a layout of the house and gardens.


How about these for embellishments fellow crafters?


Cheeky Bullseye has found himself a cosy spot to keep an eye on his many offspring!


But I don't think Scrooge is so cosy with the Ghost of Christmas Past disturbing his slumbers.


Looking down on the Painted Hall from the other side.  It sure is spectacular!


This I think, was my favourite tree as it appealed to the crafter in me.  Little Dorrit has used threaded buttons and bobbins of cotton from her sewing box as decorations to give her family some Christmas cheer on a budget. 


And another exhibit to appeal to us crafters!


 Now we have my personal favourite Dickens story, Great Expectations and Miss Haversham's dining room (Chatsworth's Dome room and Great Dining Room).  This was the perfect setting .....without the mould, lol! 


Miss Haversham very kindly turned round for me to take her picture.  Can you see her little furry friends scuttling back under her table!


The cake was beautiful if a little cobwebby and I definitely loved the chair decorations.  How stunning would they look for a modern wedding.


And finally we're on the way out!  Looking back down a beautifully decorated corridor.....


....and turning to face this gorgeous final tree!


Outside a very small glimpse of the gardens.  We could have had a walk round them but the light was going fast and I didn't fancy a walk back to the car in total darkness, not to mention the fact that we were very tired by this point.


The exit to the grounds is round the side of this grotto


When we reached the other side this was the market spread out before us.  It looked beautiful and had I not had a tramp over muddy parkland in the dark I would have found the energy for another walk round as there was still about an hour to go I think. 


 Once again Chatsworth did not disappoint.  I haven't been a regular visitor over the years even though we live barely an hour away but it's always beautiful and their Christmas Market just gets better I think.  It's definitely bigger than last year I'm sure!  I haven't been inside the house for about 40 years I would think and it's the very first time at Christmas.  I'm so glad we made the effort to go and would thoroughly recommend it.

Well, if you even looked at all the pics let alone read the post you deserve a medal but I wanted to add some info as a reminder for myself (the memory's not what it used to be, lol).  Thanks for stopping by and normal services will be resumed on my next post, Ha! Ha!

Hugs
Lesley  Xx

Tuesday, 14 November 2017

And......... Catch up #3!

Hi Everyone,

Once again I'm catching up on recent makes and this time it's the turn of some fun projects made using Tracey Easson's quirky, whimsical girls and other images that she designs for Which Craft under the banner Wonky Tonk stamps.  Several weeks ago I went to a really fun workshop with Tracey's run by Sue who organises some amazing workshops at Art Workshops in Stockton.  My friend Hazel and I went up the night before, had a nice relaxing evening and then the workshop on the following day.

There were three projects planned for the day, a fabric cover for a little notebook, and larger fabric piece which could be used to make a cushion, decorate a bag or make a wall hanging or framed piece for example.  My larger project is nowhere near finished yet but it's coming along really well and I don't rush anything, lol!  I will finish it though once my Christmas cards are done.  The third project was a fabric brooch which I have totally forgotten to take a pic of so I'll try to remember to add it to my other project when it's finished.

Tonight I'm sharing the notebook cover from the workshop.


We stamped one of Tracey's lovely girls onto fabric and painted her with DecoArt paints.  Stamped the body part again onto patterned fabric then glued it to the main piece before adding some stitching and that was about as far as I got in the workshop being the slowcoach that I am, lol!
 

When I got home I started layering and piecing together pieces of fabric from our kit together with bits of lace, ribbon and buttons from my stash.  The most difficult part for me was being random and 'wonky' with my stitching.  Having done C&G Fashion and Design years ago and lots of garments making where precise and neat stitching was a must 'wonky' is so not in my mindset, lol!


I am sooooo happy with the way this turned out and it makes me smile every time I pick it up.  Hopefully, it won't be too long before I can started creating inside the book with more of Tracey's lovely imagery as Hazel has done with hers.......she must have done about 5 or 6 different fab pages already and needs to blog them so we can all see.....ARE YOU LISTENING HAZEL.....I'M SHOUTING!!!  😄


My second project tonight is a card I made for a friend who had recently moved house.  I was rather late sending this card but I knew I wanted to use one of Tracey's fab Wonky Tonk houses and had to wait to go to StampMagic at Doncaster to get the set of stamps I needed.


 I stamped the image in Archival Ink and I think I coloured it with Zig markers and a waterbrush but to be honest, I can't remember now, lol!


I added some little spots of the colours over the card by flicking them from a fan brush.  I really love Tracey's range of stamp designs and they are a change for me as I don't normally do whimsical faces but for these beautiful girls I will make an exception any day of the week!


That's all for tonight folks.  See you again soon.

Hugs
Lesley  Xx


Saturday, 11 November 2017

And ....another catch up!

Hi Everyone,

Tonight's catch up comes to you courtesy of the only fairy stamps I like....beautiful Lavinia images by Tracey Dutton.  I always call them fairies for grown ups, lol!

A couple of weeks ago my crafting friend Emma came for an inky stamping session.  She wanted to have a play with my Distress Oxide inks before deciding whether she needed to buy any (I told her she would, lol) so we both created a few backgrounds which we saved for later stamping on and we also had a go at an alcohol ink technique as demonstrated by Tracey Dutton on one of her YouTube videos.  I'd already had a practice at one of these backgrounds, then made another one with Emma and turned them into cards.  These cards are the result of our time in my craftroom.....doesn't time fly when you're having fun!  The afternoon was gone before we realised it and now we can't wait to try out something else.

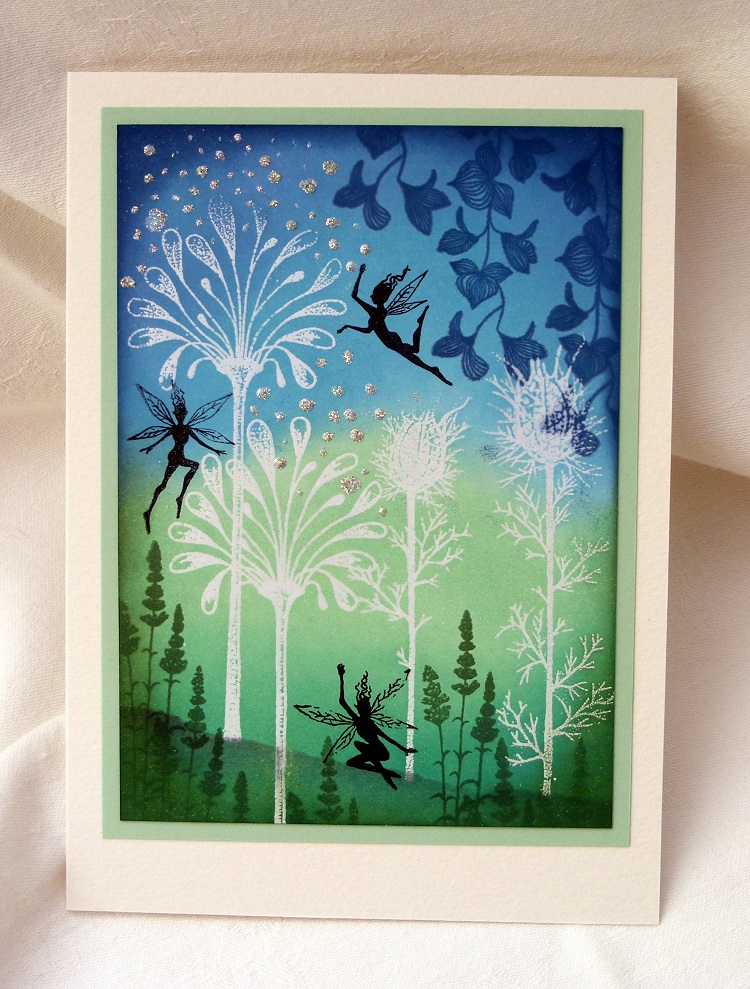
This first card was an Oxide background with main images stamped with Versamark and embossed with white ep.


I then used Archival ink to stamp the other images in various colours and used torn paper and a sponge to create the slopes at the bottom.  Oh yes some touches of stickles sparkle to finish off!


This second card was also an Oxide background which I loved but it was a bit dark for creating a little scene so I used the birches stencil and some white acrylic paint to stipple through.  I loved the misty woods effect I got.
 
 I added the fairies and toadstools with Archival ink and the fairy 'dust' with gold paint which didn't work too well so I finished off by added stickles to wings, toadstools and fairy dust.


Third card was the first of my alcohol ink experiments after watching Tracey's video.  She makes it look so simple and I suppose it might be with a little practice, lol! 
 

Anyway, after creating the background I added stamping with Archival again to create the little scene.  For this one I used my new Be Creative stamp press to stamp the silhouette fairy.  What a fab tool this is turning out to be and imo it really comes into its own for silhouettes as I never get a good image first time.  It took me three goes before I was happy with this lovely image and even the lacy wings had lost none of their definition.


Fourth and final card for tonight was created in the same was as the previous background.


After stamping the beautiful tree I coloured it with Amsterdam acrylic inks then added the little dots of various Stickles colours to coordinate with the alcohol ink colours I'd used.  I think it looks like the fairy has decorated a tree in her garden with 'fairy' lights for Christmas, lol!


That's all for tonight folks but there are still quite a few more catch up shares to come over the next week or so.   See you again then I hope.

Hugs
Lesley  Xx

Monday, 6 November 2017

A 'bit' of a catch up!!!

Good Morning everyone,

Even though it's Monday so first work day after the weekend for lots of people, it is a beautiful crisp day with sparkling sunshine so hopefully it's still a lovely day for you all.

I have sorely neglected my blog (even more than usual) for several months now and I like to at least post pics on here so that I have a record for myself of things I created.  This morning I've searched my photos to find the things I missed and I'm just going to post a couple of photos of a few today.  Hopefully I'll catch up over the next week or so.

My first share is a card I made at a quick class I and my friend Hazel (you need to check out her wonderful inspiration filled blog) did with Sheena Douglas at the Crafters Companion store not far from us both at Dobbies Garden Centre and retail park, Barlborough.  Lots of other lovely shops there too and a couple of places to eat so it's a really nice place for Hazel and I to meet up for lunch or coffee and cake, a good chat and a little retail therapy thrown in too.  This particular meet up we decided to do this quick class with Sheena, who happened to be visiting the CC store, which was great fun.  My only complaint......they had sold out of the beautiful stamp we used 😞!


We used Oxide Inks with a little glycerine which made them even easier to blend.  It was perfect timing making this card as I wanted to send one to a friend who was in hospital at the time and I know she's a Sheena fan.

This next birthday card was created when I was first experimenting with my then new Oxide Inks and making backgrounds.  I actually pinched the idea from another crafting friend, Helen, who made me a beautiful birthday card using a similar technique.


I created quite a subtle background piece using Oxide Inkpads and then used the Tim Holtz wildflowers dies to create the little bouquet.  The butterfly (an envelope full) was sent to me by a crafting friend Lin, (this fab hobby has brought me some lovely mates) and I coloured it to coordinate.


My last card for today was another birthday card.


I'd had a fab Gelli plate day a little while ago playing with various acrylic inks and stencils and I used one of the backgrounds to create this card.  I used various stamps to create even more interest then stamped the Tim Holtz dragonfly image using Versamark Ink and heat embossed with Ranger Queen's Gold powder.  I then dug out a piece of card previously created with powders which I think were a mixture of Infusions and Brusho, die cut it and arranged them on top.


Well that's my project reminders for today.  Hope to be back with a few more later in the week.  Thanks for dropping by.

Hugs
Lesley  Xx