Thursday, 25 June 2009

A Couple of Recent Cards

After you have read this post scroll down to find the link to some wonderful blog candy from Elusive Images!!!

First of all a big thankyou to any visitors who have checked back (some of you lovely people more than once) to see if I've managed to sort out my photo problems. Well, we did have a gremlin (now given the boot I hope) so things are a lot better but I still haven't sussed how to make my images clickable so that you can see an enlargement but I'll keep trying.


The two cards shown above were very quick and simple to make. I stamped the pretty flourish using Adirondack dye inkpads, dragged the colour a little with my waterbrush and added some glitter highlights. I cut out the butterflies from some Artylicious paper which was from my exclusive Graphicus Guild paper pack, added a few touches of glitter, curved the wings and attached them with silicone glue. I then stamped the sentiment with a Black Memories inkpad.

The flourish stamp (Dimension Fourth) and the sentiment stamp (Butterfly Kisses) were both bought from the NEC last March and the glitter, inkpad and Artylicious paper butterflies (which can also be found on the Artylicious Butterfly Bliss cd) can be had from Graphicus.


NOW FOR MY NEW CUTE CARD


I'm fairly new to the cute style of card but I'm getting better at them and this is the first of five I made a week or so ago. I decided to try using Distress Inks to clour my lovely images and I think my results were quite successful. Even my brother, who is a talented watercolour artist, was quite impressed by my first attempts. This cute little elf is called Alva from Magnolia Stamps and is another one I bought from the NEC from the lady who designs them. I love this little elf because .................. she has a mouth! I'm pretty sure she's supposed to be a Christmas elf because that's a poinsettia in her hand but I wanted to use her now so I used more summery colours.

The Nestability Label die, CB Swiss Dots folder, Core'dinations card and Distress Inks were all from Once Upon A Stamp. The flourish and fern leaf punches were from The Hobby House and everything else was from my stash and I can't remember where from.


AW, AIN'T SHE SWEET!


Don't forget to scroll down!

Friday, 19 June 2009

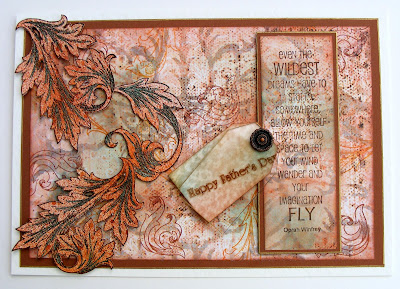
Father's Day Card

After you read this post don't forget to scroll down to find out about some fabulous blog candy from Elusive Images !!!!!!


This is a card I was asked to make by a friend and everything I used can be purchased from Graphicus, except for the base card and the brad which were already in my stash.

The background paper is from my Graphicus Guild paper pack (some fabulous papers in there) and I used a stamp from one of the exclusive Guild stamp plates to randomly stamp over it using Adirondack dye inks and I also blended inks over of the paper too. I also blended some inks over a smaller piece of the paper for the sentiment and a separate little tag that I cut from hammered card. I used Timber Brown Stazon to stamp the Happy Father's Day onto an acrylic tag, the fancy images onto some previously Glimmer Misted card and the sentiment.

I then cut out the swirly images, arranged them on my card and used 3D foam pads to attach them. I matted the sentiment and layered the card and acrylic tags together with the brad and attached them with different thicknesses of 3D foam pads.

SUPER DUPER BLOG CANDY ALERT !!!!


There will be some wonderful blog candy given away very soon over on the Elusive Images DT blog. The Elusive Images range of stamps are my absolute favourites for quality, design and style and the new ones that are to be released very soon are definite MUST-HAVES.
So click on over to the ELUSIVE IMAGES DT BLOG and check out how to enter. I wish you luck (but not too much 'cos I want to win some of it)!

Monday, 1 June 2009

Wheeee! Did I Have a Good Time Last Week

I had an absolutely wonderful two days attending a couple of workshops with the very talented Lynn Robinson-Hunter at Graphicus in Barnard Castle, Teesdale.


On Wednesday it was a Tag Book workshop and we used lots of the Distress Inks with a few other things thrown in. I've also done some more stamping to mine since I got home because, as usual, I was too slow to finish mine at the workshop (I spent too much time between tags tidying my workspace!) so I've used a few of my own items too. The idea was to build up a selection of tags showing different techniques ('how to' notes written on the back of each tag) so we had a great time blending, stamping, spritzing, spraying, emboss resisting, masking, using napkins for pretty images and image transfers using acrylic paint dabbers. I've also done a bit of masking on one of my tags here at home.
I shared the workshop with four other lovely ladies and we had a great time with quite a few laughs and giggles throughout the day. These are my favourite tags so far, but I intend to do some more on my own when I have the time (famous last words, Lol)


The second workshop on Thursday was Stampbord Creations. I can honestly say I have thoroughly enjoyed every workshop I've been to at Graphicus but this one blew me away. I have never been more pleased with anything I've made than my lovely Stampbord Mirror. I am totally thrilled with it (can you tell?). I have played with Stampbord before but Lynn certainly has a way of bringing out the best of my abilities and she showed us some beautiful pieces of Stampbord that use techniques that are taught in the other Stampbord workshop they do at Graphicus. We really should have done that first but never mind, I am still totally happy with my finished piece of artwork and I would still love to do the other workshop next time they run it.

I used Distress Inks exclusively for colouring my backgrounds and for the background stamping. I just used Stazon for the main top images. As the other ladies on the workshop asked what colours I had used I will explain here that I covered the whole of each piece of Stampbord with Tea Dye DI and then used 2 other colours blended carefully on top of that in combinations of Fired Brick, Shabby Shutters, and Spiced Marmalade. I built up the colours very slowly and carefully so that the blends were quite subtle and had different depths to them. On a few of the pieces I used a piece of mesh and others a piece of sequin waste and dabbed Pine Needles DI very gently to create a bit more depth. I then began layering my stamped images and for the background stamps I used Vintage Photo DI, stamped off once onto scrap paper, and finally a dark brown (can't remember proper colour name) Stazon for the main images.

I'm now going to go to town with my photos, even at the risk of boring you.


And here's the full piece in all it's glory!


I'm sorry if I sound a bit OTT about my mirror but I really didn't expect to come home with a piece I'm so proud of and it's all down to Lynn. She is an exceptional tutor and gets my head in just the right place to pull all this together. Had I tried to do it at home I would have ended up with a hodge podge of bits and no idea at all what to do with them so thank you very much Lynn. I can't wait for another workshop now! Thankyou also to my fellow crafters for your company, especially my internet friend Phree. We all had some really good fun and a great day altogether.

Everything I used can obviously be bought from Graphicus, except for the corner embellishments (from my own stash) and the dangly bit over the mirror which is made up of an old pair of cheap earings and a bit off an old necklace.


Sunday, 17 May 2009

My 60th Birthday Week - My Favourite Bits

The view looking out from the escarpment at Hardwick Park over Derbyshire.

It was my 60th Birthday last week and as I didn't want a big fuss made, we kept it simple with a couple of outings which I thoroughly enjoyed.

The first was a midweek visit to Hardwick Hall in Derbyshire just my OH and myself. As a child I used to live very close to Hardwick and spent many school holidays exploring the park with it's fishing lakes and beautiful Elizabethan hall. Although since leaving the immediate area when I got married I still only live about 30 minutes away but haven't visited in over 40 years. It really hasn't changed much since my childhood except that they have put in a different entrance and a one way road system which at first disoriented me completely. I soon got my bearings though and we spent a lovely afternoon, having first been for a carvery lunch at the Young Vanish pub, Glapwell, exploring the Hall and gardens. I only ever went inside the Hall once before on a school trip when I was about 12 but I did remember the beautiful tapestries which adorn most of the walls. There is an ongoing project by the National Trust to restore as many of these lovely works of art as possible. When we first went into the Hall we listened to a brief life story of Bess of Harwick given by a really nice gentleman who made it extremely amusing and interesting. Boy, was Bess some lady! She sure had the men beaten at their own game.


The gardens of the Hall are not very big but are well worth a walk round. There is a huge herb garden and a sort of wild meadow area as well as an orchard and a small (for a house like this) formal garden looking out over a formal avenue of lime trees.


We really have to go back soon because we left it too late to explore the Old Hall ruins and I would like to have visited the Stonemasons' workshop too because my youngest brother who was sadly killed nearly 10 years ago worked on some of the stone restoration of the Hall when he served his stonemason's apprenticeship about 30 years ago.


The second outing of my birthday week was last Sunday and myself, hubby, my son and his wife, my daughter and her partner, my 2 little granddaughters, my step granddaughter, my Mum and not forgetting the 3 dogs we have between us, all went to Fountains Abbey near Rippon for a picnic.


Of course, it rained but not enough to spoil our day. We positioned the 3 cars in an almost circle, raised the boot lids and stretched a tarpaulin over them and had our lovely picnic (mostly courtesy of my daughter, thanks sweetheart for your hardwork) underneath out of the drizzle. Unfortunately, I never thought to take a photo but it was great fun. The men and the dogs had a great game with the frizbie and then we borrowed a wheelchair for my mum and did the walk all around the abbey and grounds. I absolutely adore Fountains Abbey and could not have wished for a better place to visit for my birthday picnic. It was nice to take my Mum to see the place I'm always whittering on about too.

These are a few pictures to remind me of the beautiful flowers I received.

I also received quite a few pressies and some beautiful cards from my family and friends but only one absolutely gorgeous handmade card from my crafty friend Jo. We met through our mutual love of crafting over the internet just about a year ago and I'd like her to know that her friendship has come to mean a lot to me, so thankyou Jo for the wonderful card but most of all for your 'crafty' companionship and encouragement. Finally the two most precious gifts in my life alongside my own two lovely kids are my granddaughters

Isabella


and Alexa


This post was really a record for myself but I just wanted to share a little bit of the lovely week I had with anyone who feels like visiting.

Wednesday, 13 May 2009

A Welcome to Baby Ava

This is a card I posted today to my niece to welcome her new baby daughter Ava.


The pink pearlised 8" x 8" base card is from Craftwork Cards together with the co-ordinating card candy which I've used in the centres of the flowers. First of all I used Versamark and a Rollagraph design down the left edge of the card and embossed with clear detail EP. Of course, this is so subtle you can only just see it IRL let alone on a photo.

Next I stamped the image (which is a lovely Whiff of Joy stamp called Melinda blowing kisses) onto plain white cardstock using Black Onyx Versafine ink and coloured it with pencil crayons. I actually used some really cheap crayons (£1.50 for a set of about 30) from what used to be Partners because I loaned my good set to my son and, of course, he still has them. I used OWS to blend the colours a little. I used plain Rectangle Nestabilities to cut out the image and then added a little Tattered Rose DI to the edges. Next I used the scalloped Rectangle Nesties to layer the image onto ivory pearl card.

I cut a strip of design paper by HOTP and used a Fiskars border punch down both edges, attached this to the card just to the right of the clear embossed border and then tied co-ordinating ribbon from my stash. I positioned the image and used 3D foam tape to attach to the card. Next I positioned the Jones Craft flowers and the Paper Shaper Wave Flourishes which were also punched from the ivory pearl card. Finally I stamped the little sentiment which is from the Aspects of Design : Little Trumpettes stamp plate.

In my hurry to get this in the post, I forgot to photograph the inside where I stamped the other half of the sentiment - Sugar and spice and all things nice - and added a couple more swirls.

I enjoyed working on this size card and I was really pleased with the end result which I think made a change from cuddly animals or booties and rattles.

Saturday, 2 May 2009

Busy, Busy April

What with one thing and another, April has been a very busy month for me so as this might turn out to be a mega post I'd sit down with a cup of tea if I were you (or feel free to leave halfway through, Lol).


It started at the beginning of the month when I and my friend Jo went to a couple of stamping and cardmaking classes at a lovely little shop called Monk's Den at Ashby-De-La-Zouche. Unfortunately they don't operate an online shop but if ever you get the chance to go it's well worth a visit and Ashby itself is a lovely little historic town. They also run some fabulous classes involving stamping and getting inky. The morning class was called '5 Ways with 1 Stamp' and Deb, the owner of Monk's Den was our tutor. As the title suggests, we used a beautiful clear stamp from an Inkadinkado set called Morphic Bugs and did things like stamping onto acetate and using glitter on the back, stamping using Versamark and dusting with mica powders or chalks, stamping onto coloured card and then 'painting' with bleach, stamping onto shrink plastic and finally, stamping with Versafine and colouring selected areas with Sakura Stardust pens. We mounted this final image and made a simple but very effective card.


In the afternoon we took a second class which was run by Sheila Oliver who works for Deb. This was to make cards for men and we used the Eccentric Edwardian themeplate from Elusive Images to make two fabulous cards. We did lots of building backgrounds by blending inks and direct to paper techniques and we also used a Cuttlebug embossing folder on the first one. The following two cards were the result.


and this card is my own adaptation of the 'green' Sheila Oliver design.


Jo and I thoroughly enjoyed our two classes and would love to do some more when time permits. If anyone is interested in going to any of their classes or would like to see some more of Sheila's wonderful designs, links to her two blogs, Manicstamper and Manic's Inky Antics are in my sidebar as I visit them on virtually a daily basis.


A week or so after this wonderful crafty day my daughter and her family came to stay for the weekend and then as they needed child care for our little Isabella for that week she stayed with us for a few days while her mum and dad went back to Harrogate. It was a bit of a wrench for Jenna as it was the first time she had left Izzy anywhere overnight let alone for 3 nights. These are a few photos we took whilst she was with us including one of our other granddaughter Alexa.


The next event of my month was last Saturday when I went to a workshop run by Robert who co-owns Once Upon a Stamp. This was the second workshop in a set of three to learn how to work with Friendly Plastic and was brilliant fun. The first photo shows some pieces we made in the first workshop last month and the second photo shows some of the things we made this time, which include bottle top embellishments, a lovely little pendant, some beads and a button.


Unfortunately, my photography does not do these bits and pieces justice because they are really quite beautiful in real life. I can't wait for the class at the end of May when we are going to be making a gorgeous mask. I shall be a little sad though because it's the last one and apart from the pleasure of learning new techniques, Rob makes the classes really fun.


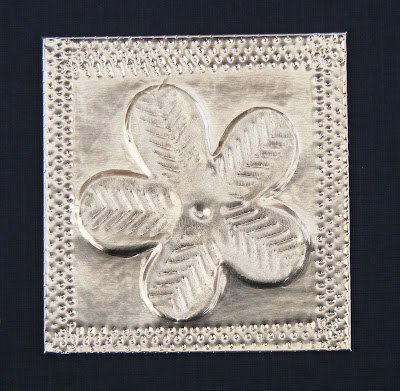
My final special event of the month was on Thursday when I went all the way to Barnard Castle, the home of Graphicus and Elusive Images, to attend a workshop with an extremely talented and lovely lady by the name of Lynn Robinson-Hunter. I've been to several different workshops at Graphicus over the past year (I'd do them all if I could) and this one was a beginners Ten Seconds Studio workshop, learning how to work with metal. It was a brilliant workshop and this was one of the most relaxing and therapeutic crafts I have tried. First of all we practiced different ways of using the tools and sheets of metal and ended by making a lovely book to put our samples in together with tags on which to write the methods we had used. I haven't done the inside yet but these are photos of a little embellishment and then the front and back covers of the book.


Well, if anyone managed to get to HERE, you deserve something a bit stronger than tea I think.

Thanks for sticking with me.