Saturday, 3 December 2016

It's PaperArtsy guest blogger time!

Hello Everyone,

For the past week over on the fabulous PaperArtsy Blog there has been lots of inspiration and wonderful projects for Topic #23 - Bleach techniques which was introduced brilliantly as always by Darcy HERE.

I love the effects you can get using bleach on paper, card, inks, etc., and have tried out various different combinations in the past.  I even have a pad which has some sort of product that removes colour that you can use as an 'ink' pad for stamps.  In all the attempts I made I have found the results to be extremely varied.  With some card and also inks bleach barely works at all and often when it does work it leaves a totally unexpected colour behind.  Some of these are lovely and some not so, lol!  I also like 'painting' with bleach if I get the right combination of card or ink  On this occasion I wanted to use stamps and stencils to remove colour from dye ink backgrounds on matte coated cardstock and I did a few experiments using bleach but found that a faux bleach technique using water was more successful.  If you hop over to the PaperArtsy Blog you can see my step by steps on how I created two Christmas cards using mainly Sarah Naumann stamps, sneak peeks of which you can see below.


Thanks for dropping by!

Hugs
Lesley  Xx

Tuesday, 15 November 2016

Whoops, I nearly forgot........

.....it's the first of November's Quick Cards posts over on the Chocolate Baroque DT Blog!

Morning All,

I completely forgot I had a couple of quick and very easy cards oveer on the CB blog today.  As we have Christmas getting ever closer and this year I am even more behind with my preparations than usual due to my slow op recovery putting a major spanner in the works, quick Christmas cards always come in handy and Chocolate Baroque have some stunning Christmas stamps suitable for every style.  Just hop over to their website and enter 'Christmas stamps' in the search bar....gorgeous!


Anyway, for my first card I simply stamped the beautiful tree onto a diecut shape, embossed with sparkly embossing powder then coloured in with some water based metallic paints. I dusted around the tree using Pine Needles Distress Ink.  After sticking the image to the card base with double sided tape I stamped and embossed the sentiment and used the same but smaller dieshape to cut it out before adding it to the card using 3D foam along with some ribbon.


My second card was even quicker!  I stamped the image onto the diecut shape using Vintage Photo Distress Ink and pulled in some of the colour with a water brush.  I then added a little grey watercolour shading around the image, edged with Vintage Photo and stuck it to the card base with 3D foam.  I then stamped the sentiment at the bottom, risking all if it had gone wonky, lol!

Do pop over to the Chocolate Baroque DT blog as there is loads of fabulous inspiration from the team members if you need a card or two in a hurry.

See you again soon.

Hugs
Lesley  Xx


Friday, 11 November 2016

Wow! I think I'm on a bit of a roll......

Morning All,

I was up even earlier than normal this morning so went more or less straight into my craftroom for a play.  I seem to be on a roll at the moment and am really enjoying being creative with relatively simple techniques instead of trying to be clever with loads of different products. It's amazing what you can achieve with inks or paints and some beautiful stamps.

This morning's offering has turned out rather grungy in contrast to yesterday's card and I've inked up some fairly 'new to me' stamps from Dina Wakley and Tim Holtz together with several stamps from one fab PaperArtsy Hot Picks set which was released last year.


I already had the piece of card covered with blended Distress Inks and some light spritzing with water to take some colour off and I just did some simple layering of stamps with various Archival Inks.  I started with the brilliant script stamp from the Hot Picks set and Coffee Archival.  This stamp is huuuggge and made up of a collage of different scripts, some going horizontally and some vertically.  It makes for a fab beautifully detailed background with one easy stamping!


I then simply added the other images on top, inked around the edges and stamped the Dina W quote onto Kraft card before cutting it out and adhering to the tag.

This tag has loads of script on it so it's my third entry to the current fab challenge over on the PaperArtsy Blog.  The inspiration from the guest designers has been stunning over the past week and a half and it's not over till Sunday!  I wonder if I'll  manage another entry before the deadline, lol!

Have  good Friday......it's almost the weekend ;D!

Hugs
Lesley  Xx
Thursday, 10 November 2016

A little more play................

...............this time with JOFY latest release stamps for PaperArtsy!

Hi Everyone,

We have a very mixed bag of weather here today, one minute bright sunshine and blue sky and the next, as it is now, dark enough to need the lights on and raining!  Whatever it's doing though it's a tad chilly, lol, so perfect for spending some of the morning in my craftroom finishing off a card I began last night.


I started with the rest of a scrap piece that I had used in my last post as my background and stamped the images bottom right with Black Archival ink.  I made up the clusters of little 'bubble' flowers using a couple of the small stamps on the JOFY set and I also stamped the leaf 3 times together with the flower head onto PA lighter weight Smoothy card.  I painted all the images with Fresco Finish Acrylic Paints and added a few white highlights.  I also went over the shading marks of  the stamps with a black Pitt  Pen to freshen them up after painting the images. 


I mounted the piece onto coordinating card, then again onto a Kraft card base then I adhered the leaves and the flower head with Matte Medium.  I stamped the words from an older JOFY set (I use these words a lot as you can mix them up to make different greetings) onto the last little piece of the background I had left, cut them out and stuck them on with 3D foam to finish the card.

Another nice bit of playtime this week and another card for my standby box.  Confession time.......I really should be making Chistmas cards but I think I am living in denial that it's only a little over 6 weeks to The Day, eeek!  I haven't bought a single pressie yet either and think I need to get my act together, lol!

See you again soon!

Hugs
Lesley  Xx


Sunday, 6 November 2016

A Tag for Fun with Elena Zinski & JOFY stamps.

Good Morning all!

After a very noisy Saturday evening (dratted fireworks which went on for almost 8 hours!) it's a beautiful peaceful, sunny Sunday morning here.  I suspect we will have another noisy evening tonight with our Snoopy barking constantly but hopefully not for as long.

Yesterday I had a little play with a mash up of stamps from Elena Zinski, PaperArtsy's newest designer and a JOFY favourite to create a fun 'Christmassy' tag.


I started out with a piece of copy paper I had dabbed left over Fresco Finish  paints on from a sponge.
 

I ran some Snowflake Fresco over it with a brayer to knock the colours back and covered a tag with the paper.

I stamped all the images with Black Archival ink making an alternative Christmas tree from one of JOFY's dandelion style flowers and the pot from one of her real Christmas tree stamps.  I also stamped Elena's cute little monster again onto card.  The one stamped directly onto the tag I made a little Christmassy by turning her hat into a Santa hat and adding pompoms using one of the small stamps from the set.

I coloured all the images with Derwent Coloursoft pencils, cut out the body and head of the little monster and stuck it onto the tag.  Next I blinged it up a little with some Stickles to the tree, stars and the white bits on the hat.  I think you will see the sparkle if you click on the pics.


Finally I mounted the tag onto co-ordinating card and added the ribbon.

EDIT - As my friends are pointing out this does look more like a tag for the current topic here in the UK, ie Bonfire Night fireworks, lol!

Have a pleasant Sunday and see you again soon.

Hugs
Lesley  Xx

Wednesday, 2 November 2016

Told you I like Words ....PaperArtsy Blog Challenge entry #2!

Good Morning All.

What a gorgeous morning we have here in Notts!  Fabulous bright blue sky and brilliant sunshine albeit with a slightly chilly wind but much better than the grey and drizzle we had yesterday.

I really love the current PaperArtsy Blog Challenge topic of Typography, Fonts and Quotes and I have made a second entry..  Already there has been a lovely project Pavla Hozikova and of course, the inspirational intro from Darcy.  Unusually for me this entry is a journal page in my 'Sam's Journal' (so called because it was a gift from my friend).  I'm not very good at this journalling lark but do try to swipe left over paints and inks from other projects onto pages (when I remember) and then have a go at a later date.


This started off weeks ago as random brayering of leftover Fresco Finish paints in Nougat, Blush, Rose and Taupe and I'd stamped in Coffee Archival ink with a PA script stamp.
 

I then just started adding layers of stencilling, stamping and some left over diecuts. 
 

I've used Fresco Finish paints and Archival Inks for stamping and stencilling.
 

I also stamped some circles with a Colourbox white pigment ink and clear embossed it.  There's a bit of white pen inside the diecut 'holes' and a little Treasure Gold here and there.
 

Finally I stamped the quote onto card, cut it up, roughed up the edges and inked them before sticking them to my page and adding a bit of graphite pencil round the pieces.

Everything I used on this page is from PaperArtsy!

As I said I don't really know what I'm doing with journalling but I enjoyed the play and although many would probably think the colours are rather dull they are right up my street, lol!

I might be back with some more entries before the two weeks are up on this challenge, lol!  Have a good day everyone.

Hugs
Lesley  Xx

Monday, 31 October 2016

Typography, Fonts and Quotes - A simple tag!

Good Morning all....

..... on what is apparently quite a foggy Monday morning in some areas of the UK.  Here in my little bit of Nottinghamshire we have a pretty pearly sky and it looks as though we could have a pleasant day ahead.

The fab new topic of Typography, Fonts and Quotes which started on the PaperArtsy Blog Challenge last night is one I love, especially quotes. As always the intro to the topic from Darcy is interesting, informative and full of wonderful inspiration so do hop over for a looksee.  It's is very rare I make something that doesn't have some form of script/wording on it so I'm hoping I have lots of time to play this next two weeks.

I have a simple tag to share this morning which I already had out on my desk having hoped to make another quick entry to the previous topic but it didn't get done so I changed plans to the new topic.


A few days ago I rediscovered some tags which my friend Judith shared several years ago now and which had been stained with coffee or tea  and I used one for this piece.  It actually still has a lovely faint aroma of coffee after all this time ;-)!  I started by blending some Vintage Photo Distress Ink around the edges and then stamped the beautiful delicate script stamp from one of Lin Brown's latest stamp sets using Potting Soil Archival Ink.  It amazes me how a stamp so fine and detailed can stamp so clearly.  Next I stamped the grass, another gorgeous stamp from the same set using Sienna Archival Ink.


I found a small Kraft tag, inked the edges with Vintage Photo then stamped the skeleton leaf from Lin's other new release with the same ink.  I stamped the quote onto a piece of vellum several times with Sienna Archival and heat embossed with clear ep before cutting it into bits to give me the widest border around the words possible and stuck the bits on.

I really enjoyed this bit of spontaneous play and I'm off to link up to the challenge before getting stuck into the usual boring Monday chores, lol!

Have a good week!

Hugs
Lesley  Xx


Sunday, 30 October 2016

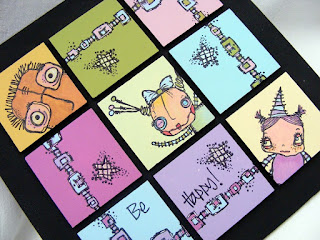
PaperArtsy Blog Challenge #20 - Squares and Grids

Good Morning all on this very grey Sunday.

It's rather damp too so I'm glad that the project I had great fun creating yesterday (gave myself a whole playday ;D) is nice and bright and cheerful.  It's the final day for entry into the current PaperArtsy Blog Challenge and I didn't think I'd get anything made in time but I so wanted to ink up my new Elena Zinski stamps then on Friday evening my buddy Hazel shared a fab bright abstract project on the PA Blog which gave me the inspiration to get started.


First I covered a 20 cm square canvas board with black gesso and set it aside to dry.


Next I took nine 5cm square pieces of Stampbord and nine different colour PaperArtsy Fresco Finish paints and painted each square by patting the paint on with a piece of Cut n Dry foam.  If you want a smoother finish use the soft foam side and if you want a more textured finish use the hard side. I edged each square with black gesso.......very carefully, lol!


When the squares were thoroughly dry I stamped all the images using Black Archival Ink and heat embossed them with clear embossing powder.  Obviously, I couldn't get the whole 'monster' images on my little squares so I tried to make them look like they were peeping round corners.  I then coloured them all with a mix of the same Fresco Finish paints and Prima watercolour paints.  The little stars are coloured with sparkle Sakura pen.


I really enjoyed my first play with Elena's cute little monsters and think I need to add more to my collection now, lol!  

Have a good Sunday everyone!  I'm off to link to the challenge now.  See you again soon.

Hugs
Lesley  Xx


Saturday, 15 October 2016

Quick Cards for Chocolate Baroque

Hi everyone,

I hope you're having a nice chilled Saturday and that the weather is being kind to you.

Today Judith on the Chocolat Baroque DT Blog is sharing a post full of quick card inspiration from the DT and it includes a couples of cards I contributed. 


For this first card I blended some Portfolio Pastels onto a piece of card with my finger then stamped the image with Black Archival Ink. I made sure it was dry by using my heat tool and this fused the ink into the pastels which was a nice effect but quite accidental, lol!  I stamped the sentiment onto my base card and embossed with clear embossing powder then I cut a rectangle to use as a mask so that I could randomly stamp the pretty leaf.  I stamped twice from each inking of the stamp then finally drew the squiggly border round the sentiment with a black fine liner.


I mounted the main image onto coordinating card then black card before attaching it to my base card.


For this card I inked up the lovely fern stamp with two different Distress Ink colours and stamped twice each time. I then inked up with two different colours and stamped again a couple of times.
 

I put a couple of drops of Distress Ink in two of the colours I used for stamping onto my craft mat then spritzed a little water before picking the ink up on an old toothbrush.  I then flicked the bristles to get the delicate spray.  I next used a dusting brush to add a little light colour to the background with also highlighted the edges and then stamped the sentiment.  Finally I added the ribbon and the metal leaf which I gave the Treasure Gold treatment to before adhering the whole thing to my base card.

These were both really quick cards to make (once I'd managed to think of them, lol) and if you hop over to the Chocolate Baroque blog you'll find lots more inspiration for using CB's gorgeous stamps from the rest of the DT.

Enjoy the rest of your weekend and thanks for dropping by.

Hugs
Lesley  Xx

Monday, 10 October 2016

It's been a while........

......... since I had a project on the PaperArtsy Blog.

Good Evening everyone,

Because of family stuff followed by my surgery it's been a while since I felt able to commit to a project for the fabulous PaperArtsy Blog so it's a good feeling to have created a piece for the current topic of Die Cuts.  As always the introductory post from Darcy is brilliant.

If, like me you have loads of dies that never see the light of day (really should have a sale of some of them) it's good to be encouraged to dig some of them out and put them to good use.  There has been some fabulous inspiration on the PA Blog for the past week showing different ways to make use of dies and I think mine is perhaps a bit more basic but I was pleased with my finished project and did have fun making it.  Here's a sneak peek and if you would like to see the whole thing hop over to the PaperArtsy blog for all the details.


See you again soon.

Hugs
Lesley  Xx

Thursday, 6 October 2016

For once it's not a card!

Hello again,

Wow, not often I do two posts in a week let alone two in one day, lol!  This time I have three ATCs made for a swap to share with you.


I tried to use up a few of the zillions of bits and pieces of leftovers I can't bear to throw away after making something.  The substrate for them all was corrugated card packaging I've been saving forever, lol!


For this first one I covered the ATC with a piece left over from my very first Gelli plate play, stamped with a small script stamp using Coffee Archival Ink followed by a PaperArtsy Ink and the Dog image with Black Archival and coloured small areas of it using pencils.  I then added some Christine Adolph adhesive rub on and gold foil and finally a piece of heavyweight Kraft card border which I sponged with Chalk Fresco Finish followed by Claret and then stamped with Gold Metallic Fresco Finish.  I finished off with Classic Treasure Gold around the edges. 


The second one was covered with a piece of paper brayered with a few shades of green Fresco Finish acrylic paint, a leftover from a recent project.  I created the impression of a hill with torn paper and sponged Archival ink then stamped the tree and foliage (stamps designed by my friend Deborah Wainwright who shares her fabulous art HERE) using more Archival Inks.  I found the honeycomb diecut in my scraps so added some Frantage embossing to it and then adhered it to the ATC along with a scrap of mesh.  Finally I inked around the edges with Olive and Black Archival Inks.
 

I started this third one by brayering over the corrugated card substrate with a couple of pink shades, Nougat and Taupe Fresco Finish.  I followed this with a little random stamping of a PaperArtsy small script stamp and Coffee Archival Ink. The beautiful Ophelia image had been stamped onto tissue and sprayed with Glimmer Mists (I think) at least two or three years ago, lol, so I decided it was time she was given a home. I adhered it with Soft Matte Gel  giving it a top coat of gel once it was stuck down smoothly.  I attached the ribbon and scrap of lace to the bottom and the flowers to the top then applied White Fire Treasure Gold to the flowers and round the edges of the ATC.

Thanks for visiting and see you again soon.

Hugs
Lesley  Xx

A Card for a Very Special Person in my life!

Hi Everyone,

A couple of days ago it was my beautiful Daughter, Jenna's 36th birthday.  Boy, does that make me feel old and where on earth are the years flying away to, lol!  Today I am sharing the card I made for her.

Back on the front cover of the September issue of the Craft Stamper mag Hermine Koster shared a card using Zig Clean Colour Real Brush Markers which I really liked and this is my take on that card.


I had bought a set of these lovely markers when I went to the Happy Stampers show at Port Sunlight back in May but hadn't played with them much so this was a good opportunity.  The stamps I used were a mixture of PaperArtsy (Lin Brown), Unity, Artemio and Indigo Blu.  I was really pleased with the clean, fresh look of this card although I have to admit to several attempts at stamping the teasels before I was reasonably happy.  Must practice more I think, lol!

Thanks for dropping by and see you again soon.

Hugs
Lesley Xx

Thursday, 22 September 2016

Playtime with new goodies!

Morning everyone,

It's a bit of a mixed bag here weather wise by the looks of it.....had a little fine rain, lots of cloud and the odd burst of sunshine and I've not been up and about long (had a little lie in ;D).  Hope the sun wins out in the end!  

Last week my lovely friend Sam sent me a a parcel of DecoArt goodies (to cheer me up as my recovery is taking so long).  I was blown away by her kindness and generosity and couldn't wait to have a play.  First of all I watched loads of Andy Skinner YouTube videos to give myself a bit of insight into how the products work and my favourite was a gorgeous crackled heart so that's where I decided to start.  I totally forgot to take a pic of the heart on its own when it was finished but I was so chuffed with it so immediately started searching through my stash for stuff to create a suitable 'setting' for it.

I am not going to bore you with step by steps, partly because I was having such a good time playing I forgot to take any photos, lol, but there are quite a few layers at each stage and I would recommend watching Andy's excellent videos and then just play to get to know what these products do.  Sam has lots of projects on her blog where she's used DecoArt goodies too.

Anyway, here goes with a few photos.


 A couple of close ups of details....


Products used : DecoArt black Gesso, black modelling paste, clear Crackle Glaze, White Crackle Paint,
                         various Antiquing Creams and Fluid Acrylics, Soft Touch Varnish, Ultra Matte Varnish.
                         Supplemented with a couple of PaperArtsy Fresco Finish acrylics & the wooden block
                          frame.
                         Tim Holtz stamps and embellishments.
                         Rusty wings and wire from I know not where they have been in my stash so long, lol!

Till next time.......

Hugs
Lesley  Xx

Saturday, 17 September 2016

Using up scraps.....what me???

Good Morning All,

This weekend is the fab craft show at Alexander Palace and lots of my crafting buddies are going  My favourite company PaperArtsy have a huge stand there with lots of fabulous new goodies I'm dying to get my hands on.  I haven't been to Ally Pally for at least a couple of years now and I must admit I'm missing it as apart from shopping it's a great show to meet up with friends.  I've just been texting with two very dear crafting friends who are on their way as I type and I hope they and everyone else I know have a fabulous day/weekend.  I will have to content myself with the lovely StampMagic show at Doncaster in a month's time when hopefully I will be up to a full day out.

Anyway, I have a couple of cards to share today and unusually for me I managed to use a few scraps from my scrap box(es).  They are quite a contrast to each other.


For the first one I used a square of designer paper (no idea whose) which was dark brown with touches of orange and a sage green design.  I toned it down a little with a very light wash of watered down Chalk Fresco Finish Paint and a little background stamping using a Colorbox white ink.  


Next I found a square of card I had previously brayered with Fresco Finish pinks and oranges.  I added some more orange and some sage to tone it in more with the dp and then used Wintergreen and Sage Frescos to stencil the  Lin Brown leaf.  Next I added some stamping in the background and the quote using Archival Inks before finally stamping the lovely leaf spray with Potting Soil Archival and embossing with clear embossing powder.  I distressed the edges of both layers, sponging them with the Potting Soil Archival then wrapped the wired paper string before layering up onto the base card.

All the stamps I used are from PaperArtsy's new Lin Brown releases plus a little stamp from one of Sarah Naumann's sets.
 

My second card uses a piece of Brusho'd watercolour paper that I did when I first got my Brushos.  Aren't the colours fabulous!  I stamped the HoneyDoo Lilies with Memories white pigment ink and embossed with Wow brilliant white ep.  I then removed some of the colour from the flowers with water and a brush. 


I then stamped the swirls (again HoneyDoo) using the Memories white and a red Archival Ink.  I edged the piece with a red Sharpie and stamped and embossed the sentiments onto a scrap before cutting them out, edging in the same way.  

I still have tonnes of scraps and I know I will never use them all but I feel quite virtuous using these few and loving the results too.  It's also added a couple more cards to my standby box ;-)!

Have a lovely weekend everyone whatever you are doing.

Hugs
Lesley  Xx

Wednesday, 7 September 2016

The first on my September birthday list...

for my lovely Sister-in-Law!

It was Linda's birthday a few days ago and for once I got the month right.  We've only known each other 40+yrs but for some reason I nearly always think her birthday is October and I was determined to get it right this year.  This was the card I made for her.


I already had the Infusions background piece from a little play when I first bought these gorgeous little bottles of powder and can't remember what colours I used now.  The photo doesn't really show them very well and probably looks a bit dull but there are some lovely little splashes of blue and lemon.
 

I stamped the wildflowers (Artemio stamps) with Versamark Ink and heat embossed with bright white embossing powder and then overstamped with black Archival once the embossing had cooled down.  I distressed the edges and and then applied Star Dust Stickles all the way round and onto the flowers and left it to dry.  I stamped the sentiment & butterfly onto a scrap of the background and gave them the Stickles treatment and left to dry too.  I then assembled the pieces and stuck them to a base card.

Linda was really happy with the card and my two nieces liked it too.  I'm just pleased I got it there on time this year, lol!

Have a good day everyone...soon be Friday ;-)

Hugs
Lesley  Xx


Sunday, 4 September 2016

First play with gorgeous new stamps from Lin Brown for PaperArtsy.

Good Morning All,

Last night I actually felt up to getting to know my gorgeous new stamps designed by the lovely Lin Brown for PaperArtsy (you can see their launch on the blog HERE) and managed to make a card in one session for a change ;-).


Like a lot of people I love the colours of Autumn and these stamps are perfect for them.  I started by masking off the two larger circles with a mask/stencil by Heidi Swapp that I bought years ago.  I used ink dusting brushes to apply shades of Archival Ink around them then, after a blast with the heat tool to make sure the ink was dry, I removed the masks and positioned the stencil, first over the large circle and then over the smaller one applying Archival ink with the brushes again.
 

Next I used some of the very useful background stamps, again with the Archival inks, to create.......the background, lol!  Another blast with the heat tool before replacing the stencil, first to stamp the grasses (adore this stamp)  and then the smaller one for the skeleton leaves which I inked up with two shades of Archival.
 

I finished off the grasses by adding touches of watercolour metallic paint so I've included pics from different angles to hopefully catch the subtle shine. 
 

I stamped the second skeleton leaf onto ink dusted card, positioned the laser cut frame to draw round before cutting it out and sticking it to the back of the frame.  I also added a little White Fire Treasure Gold to the frame and stuck that in position.  The sentiment is from another older set of Lin's.  Finally I risked it all by using a fine Sepia Pitt Pen to squiggle the frames around the circles.  My hands don't always do what I ask these days for fine stuff but on this occasion it turned out right ;D.

The eagle eyed amongst you may notice that there are small areas where the dusted ink has been 'grabbed' on the card and at first I was at a loss why (although I didn't mind the effect).  I eventually realised it's the adhesive on the back of the mask/stencil.  It's still very sticky even after several years so I think I might have to dust it with anti static powder before I use it again.

I think this card fits with a couple of challenges (not often that happens, lol) so I'm going to link to:


I'm filling my birthday card stash up nicely now which makes a change.  More to share later in the week!

Have a lovely Sunday everyone and thanks for dropping by.

Hugs
Lesley  Xx

Friday, 2 September 2016

It's a full month for birthdays!

Hello everyone,

Well, recovery is still making very slow progress after my op but I have managed a little playtime in my craft room.  Quite a few friends and family have birthdays this month and I only had one or two in my box so I needed a few more.  I haven't decided where today's card is going yet but it's a little different for me so I wanted to share now (and my poor blog is being sadly neglected, lol).


I wanted to make a mixed media card incorporating pretty napkins and stamping on tissue and this was the result.


I started with spreading Grunge Paste through a word stencil and when that dried I gave it a quick slightly watered coat of Snowflake with a little Nougat Fresco Finish.  I then created some drippage but for the life of me I can't remember what I used, lol!  I think I made a puddle of two shades of Inktense, applied it to the card with a paintbrush and spritzed with water to form the runs.  I also added some stamping using PaperArtsy minis and the sentiment using Archival inks.


I stamped the PaperArtsy Hot Picks image with Black Archival onto some Tim Holtz tissue, tore round the image and applied to the square with Golden Matte Soft Gel.  I then tore the tulips from a napkin and applied this piece in the same way but being much more careful with this delicate layer.  I also gave a top coat of Soft Gel.  I lightly applied Silver Treasure Gold to the edges and texture paste areas as well as picking up some of the texture from the tissue.  Finally I edged the square with black and applied it to a Kraft card base.

I'm really pleased with how this turned out!  I have a couple more cards to share soon so I'm not doing too badly with my productivity, lol!

Hugs
Lesley  Xx